Tuesday, August 18, 2009

Out of the Box Fun


Cake Pops
Normally I'm against box cakes. I prefer to pour over the recipe books, pick out the best one, hunt for the best ingredients, carefully measure everything and marvel as all the separate pieces are transformed into something fragrant and beautiful. But this time I decided to just have some fun. I've been ogling Bakerella's ingenious Cake Pops for a long time now, promising myself that one day I'll give them a try. Last Friday was that day, since that's what I decided to bring to my friend's baby shower. I rushed over to a friends house having filled a large box with all the supplies and got right to work. It took less than 5 minutes to whip up a batch of Duncan Hines chocolate cake batter, pop it in the oven, set the timer and settle on the couch to catch up with my friend. Once the cake was done and cool, it was actually somewhat therapeutic to sit with a bowl on my lap and reduce what my friend lamented was a perfectly good cake into crumbs. You can go here for the full instructions, but here are a few things I learned while making these:

1. Don't add the whole can of frosting to the crumbs. Add 3/4ths and see if it's enough first or your mixture will be too soft.
2. Don't make the balls too big. Walnut size or a bit smaller is perfect.
3. Make sure you have the right size cookie cutter all set and ready to go...otherwise you'll end up shaping them by hand and they'll look more like mushrooms then cupcakes.
4. Use candy coating if you want them to look like Bakerella's. I'm against it on principle, so I used semi-sweet chocolate for the bottoms and colored white chocolate for the tops, but they were both too thick to make a nice smooth thin coating, so my pops don't look like hers. For my first try, I decided I was okay with that.
5. If you get tired of dipping before all the balls are coated...you can just wrap them up and pop them in the freezer...they make great snacks for later :D

They were a hit at the shower and I hope you do try making them, especially if you have kids around. You can let them decorate these however they want and since it's straight out of a box, you'll get to the fun decorating part pretty quickly. Next time, I'm going to try the Hello Kitty ones. Aren't they adorable?

Cake Pop Closeup

Friday, August 14, 2009

The Best Focaccia Ever


FocacciaSandwich
I love Roasted red peppers. I love everything about them. I love how they look under the broiler, all bright red and glossy from the thin coat of olive oil. I love when the thin skin peels right off in one or two large pieces, even if it doesn't often happen that way. I love how it tastes and I love how it looks tossed with a pile of caramelized onions in a jar, or even better on toast. It's the easiest thing in the world to make and it never fails to impress, which leads me to my recipe for the best focaccia bread recipe ever from what is becoming one of my favorite cookbooks, Apples for Jam, topped with soft goat cheese and roasted peppers:

Olive Oil Focaccia with Goat Cheese and Roasted Red Peppers
adapted from Apples for Jam:

1 3/4 cups warm water
1/4 oz active dry yeast
1 tsp honey
2 tbsp olive oil
600 grams flour
1 tbsp Italian seasoning
1 tsp garlic powder
1 1/2 tsp salt

4 red peppers
1 large onion
a bit of olive oil


- Put water, yeast, honey, 1 tbsp oil and about a cup of the flour into a bowl and mix until smooth. Cover with a towel and leave in a warm spot for 20-30 minutes until it all froths up and looks foamy.
- Mix in the rest of the flour, the Italian seasoning, garlic powder and the salt and using a dough hook, mix for 4-5 minutes until it's well incorporated. I have a stand mixer, but if you don't she recommends you just mix it with your hands by slapping it around the bowl for a while. Cover the bowl with a towel again and let it rise in a warm spot for about an hour and a half. It should puff up a great deal.
- Lightly oil a rectangular baking dish (11x16). Punch down the dough lightly and carefully spread it in the dish, gently stretching it to the edges making sure it's mostly even. If it won't stretch, leave it for a few minutes and come back to try again, but don't rip it. Tent it with a towel (put some glasses around the dish and drape the towel over them) and let it rise again for about 45 minutes.
- Wash and dry the red peppers and rub completely with a bit of olive oil. Place on a baking sheet and broil them until their skin is nicely charred, checking and turning them every few minutes to make sure it's even.
- Turn down the oven to 450F when you're done, put the peppers into a bowl and tightly cover with saran wrap to let them steam and cool a bit for about 15 minutes.
- Slice the onion into thin ribbons and cook with a bit of olive oil on medium in a large skillet, stirring frequently until they're soft and a nice caramel color. Set aside.
- Mix the remaining 1 tbsp of oil with about a half cup of hot water and a teaspoon of salt. Stir until the salt dissolves.
- Make some dimples in the dough with your fingers and brush well with the water mixture. Put in the oven and bake for about 20-30 minutes until the bread is golden on top.
- While the bread is baking, uncover the peppers and carefully peel as much of the skin as you can. Take out and discard the stem, the seeds and some of the inner membrane and slice the peppers into ribbons. Add to the onions and toss together.
- Let bread cool a bit and then pop out of the pan and cut into pieces. Spread some goat cheese on each slice and top with the pepper mixture. Enjoy!

Thursday, August 13, 2009

Surprise Tea Party


SugarBowl

I am notorious for ruining surprises and, as is usual with ungrateful children, I blame the parents. My dad will buy a birthday present a month in advance and he'd be bursting to give it to you the moment he gets home. He doesn't want to wait even one extra minute to see the look of joy on your face and I tend to be the same way. I try to trick myself into keeping the present a secret by hiding it from myself, which is how I end up with a closet full of forgotten presents that get delivered years later and not always to the people I bought them for. And if someone else dares to plan a surprise for me, I manage to find ways to undermine that too. One year my friends came to pick me up for a surprise birthday outing where they were going to treat me to a pedicure and manicure (that was supposed to be the surprise), only to be greeted at the door by a very excited me, showing off the freshly manicured fingers and toes that I had gone out and had done that very morning.

BerryBowl

Despite this family history, we keep trying to make a surprise work. We keep planning surprise anniversary nights on the town, hiding that perfect present for a birthday months away, and organizing a party that for once will definitely be a complete surprise. I'm happy to announce that two of us finally succeeded! My little sister and I have set out to throw a surprise baby shower for my older sister who's expecting my second nephew, and on a one week notice no less! My job was to cook and host while my little sister's task was to keep the surprisee out on the town all morning and casually drop by to "pick me up for lunch". Considering that she's a terrible liar, she did a wonderful job because when they walked in and my sister saw a house full of her friends she was speechless (and she's almost never speechless). Is this the beginning of flawlessly executed surprises going forward? Probably not, but it felt great to succeed for once.

TableScape

As usual, I got a bit carried away with the menu, and I'm going to include as many recipes as I can type out before my fingers go numb, but I wanted to take a minute to thank Olga for these lovely pictures (I was too busy tending the table, passing around plates of food and keeping the glasses full of the Blood Orange Sparkling Juice to remember my camera until it was too late). Thank you for letting me use them here :)

CucumberPestoSandwiches

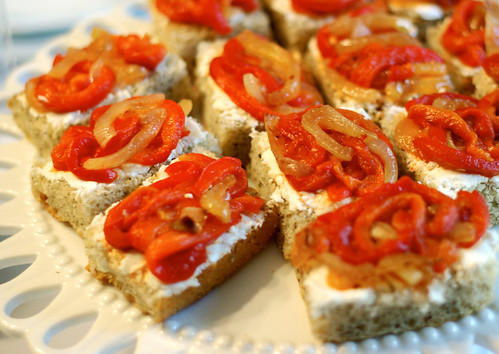
First up we have the lovely 
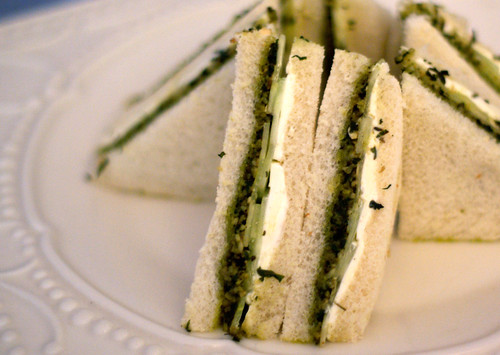
Pesto Cucumber Sandwiches:

Pesto:
This recipe will be a bit on the hazy side because I just tossed it together from memory. I crammed several very generous bunches of basil (let's say 3 cups?) into the food processor, added several handfuls of pine nuts (about half a cup?) and whirred it into a paste. I added a healthy stream of olive oil (let's say 1/3 of a cup), some salt and pepper, several cloves of mushed up garlic and whirred it again until the paste was uniform once again. Finally I added lots of freshly shredded Parmesan cheese (1/2 a cup?) and whirred the machine once again until I was happy. I'm sorry for the fuzzy measurements, but I assure you, as long as your ingredients are fresh, the results will be lovely even if you're a few teaspoons off on any one thing and you can always add more "stuff" if it doesn't look right to you.

Sandwiches:
Once you have your pesto, just slather it onto a slice of white bread and cover with thin slices of cucumber. Spread some softened cream cheese on another slice of bread and sandwich the two together. Cut off the edges (they can be tossed or one of your guests can nibble on them behind your back) and cut on the diagonal into two triangles. Repeat for as many sandwiches as you want or as long as the pesto/bread/cucumbers last.


Next up were the popular Zuccini Triangles, the recipe for which I've had for years and I think came from Betty Crocker. They're in the lower right-hand corner of the picture of the table above.

3 cups shredded zucchini (3-4 depending on size)
1 cup Bisquick mix
1/2 cup finely chopped onion
1/2 cup grated Parmesan cheese
2 tablespoons chopped fresh parsley
1/2 teaspoon salt
1/2 teaspoon seasoned salt
1/2 teaspoon Italian seasoning
1/8 teaspoon pepper
1 garlic clove, finely chopped
1/2 cup vegetable oil
4 eggs, slightly beaten

- Heat oven to 350ºF. Line a rectangular pan with foil and brush with olive oil.
- Stir together all ingredients in a great big bowl and spread in pan.
- Bake about 30 minutes or until golden brown.
- Let the pan cool a bit, lift out the foil onto a cutting surface and cut into squares, triangles, or whatever shape you like.
Note: if you make these in advance, they don't mind a quick turn in the microwave one bit.

Yikes! I've let the time get away from me once again and now I must go to sleep, but stay tuned and I'll post the rest of the recipes in the next day or so.

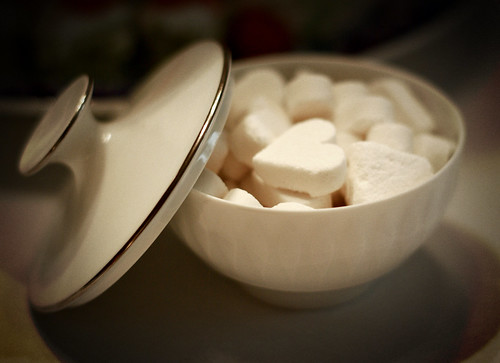
P.S. Don't you just love the heart shaped sugar cubes up above? They make a cup of tea just that much sweeter :)