Tuesday, December 28, 2010

Apple Cider Caramels

I love making caramel almost as much as I love making jam. When I hover over my blue dutch oven filled with bubbling deliciousness I feel like a voodoo doctor simmering a magic potion in a cauldron, patiently giving it a stir or a nudge and carefully watching the magical transformation from grainy sugar to a beautiful golden syrup. Then carefully offering the cream as a sacrifice to the erupting volcano gods of sugar, accepting the tower of steam as a reminder of their power and feverishly stirring to ensure that the offering is accepted and the mixture turns smooth. Heating the glossy mixture until it's practically pillow-like, and then the eternal wait after the lot has been poured and stands cooling on the counter. But if all was done just right and the lords of caramel are kind, you will be rewarded for your vigilance with pretty bits of luscious candy to be shared with only those most worthy of your efforts.

Apple Cider Caramels


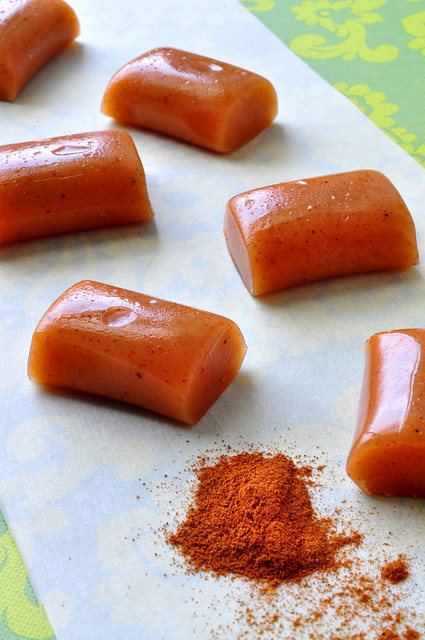
The lovely Kate at Our Best Bites posted this recipe for Apple Cider Caramels on her blog and I absolutely had to give them a try. Twice. I followed her instructions in all things except for the cutting. A long time ago, I saw caramels at a gourmet shop being sold in logs. Like a 9"x.5"x.5" square log wrapped up in parchment and a pretty sticker keeping the center from unwinding and two little ribbons on the ends. Kind of like a cut your own damn caramels system and since I hate the individual wrapping part, I went with the logs, which cut down the wrapping process dramatically. Plus, as Kate pointed out, "Cut your own damn caramels" makes for a fantastic slogan and works in all sorts of real world situations.

Apple Cider Caramels
Recipe from Our Best Bites

2 cup high-quality apple cider
1 cup heavy cream or whipping cream, divided
1 tsp ground cinnamon
Pinch nutmeg
1/4 tsp allspice
1 1/2 cup sugar
1/3 cup light corn syrup
1/2 cup real butter, cubed

- Pour cider into a medium saucepan and boil on high for about 20 minutes or until the cider is reduced to 1/3 c. Keep an eye on it...it might try to run away. Set aside to cool.
- Line an 8" square pan with parchment paper, making sure to leave about 1" hanging over the edges for easy removal. Coat with a bit of vegetable oil and set aside.
- In a small bowl, combine 2/3 c. cream, cinnamon, nutmeg, allspice, and reduced apple cider. Set aside.
- In a large, heavy saucepan, combine the sugar, 1/3 c. whipping cream + enough water to reach the 1/2 c. line on the measuring cup, and corn syrup. Cook over low heat until the sugar dissolves. Insert the candy thermometer and simmer until the syrup reaches 234 degrees.
- Remove from heat and slowly whisk in the cream mixture. Add the cubed butter and stir until the cream and butter are fully incorporated. Return the pan to heat and re-insert the candy thermometer. Cook over low heat, stirring frequently, until the temperature reaches 248 degrees.
- Remove from heat and pour the caramel into the prepared pan. Let the mixture cool completely at room temperature or in the refrigerator. I covered the top of the pan loosely with saran wrap and left it out overnight. You could cut the caramels into 1/2" squares and wrap each caramel in wax paper, but I'm lazy so I cut the caramel into 1/2" logs, which meant that I had exponentially fewer pieces to individually wrap. Store in an airtight container or in the refrigerator for up to 2 weeks, but I can guarantee that they won't last that long. These things are delicious!

Tuesday, December 21, 2010

Shortbread Walnut Sandwich Cookies

I can't help it, I must bake for the holidays. It's in my DNA. In fact, if you looked at my DNA string, I'll guarantee you that there will be ladders of links to recipes and tiny sticks of butter connecting them twirling about. I've tried to keep the craziness to a minimum. There are no "regulars", no white chocolate cranberry cookies, no toffee (I'm sorry family, tough noogies). I'm only making time for the new stuff, the stuff that's exciting and interesting to experiment with. But believe me, this cookie is a keeper.

I bought these little molds from King Arthur Flour ages ago, and I'm now glad that I did, because it looks like they don't carry them anymore. The closest thing they have now is this, but it's not the same. I found them when I was reorganizing my kitchen last weekend and I set them out, determined to make use of them. A few days ago I said to myself, if I have everything needed to make these, if I don't have to make a grocery store run, these will get made, if not, back in the drawer they go. Lucky for you the recipe, which I also got from KAF, is the simplest thing in the world. Butter? check. Walnuts? check. A little bit of time had to be invested, just because you need to fill each mold individually, but I put on some reruns and got into the rhythm of it. Very therapeutic.

The cookies are tender, buttery, with a wonderful toasted walnut flavor. I didn't use KAF's filling recipe, going with a Nutella spiked ganache instead, but the chocolate filling is really only there to keep the two walnut halves together and to accentuate the walnut flavor, so it doesn't really matter which way you go. I've made this recipe twice now and trust me, it's totally worth it.

Walnut Shortbread Cookie

Shortbread Walnut Sandwich Cookies
adapted from KAF
The recipe they listed didn't make nearly as many cookies as they said it should have. Maybe I was overly generous when filling the molds, but they came out great, so I'd recommend doubling the recipe, like I did here.


1 cup soft butter
2/3 cup light brown sugar
1/2 tsp salt
2 tsp vanilla extract
2 cup flour
1/4 cup cornstarch
1 cup very finely chopped walnuts

12 oz semi-sweet chocolate
1/2 cup heavy cream
2 Tbsp unsalted butter
1/4 cup honey
1/2 cup Nutella

- Preheat the oven to 375°F. Get out your molds or a mini madeleine pan; there's no need to grease anything.
- Beat the soft butter, brown sugar, salt, and vanilla until fluffy.
- Stir in the flour, cornstarch, and nuts. Just use a spoon or a sturdy spatula. It comes together quickly and you won't end up covered in flour like you would be if you tried using the mixer. Trust me.
- Shape the dough into a rectangle or square, wrap it in saran wrap, and refrigerate for 30 minutes. Cut the block of dough into squares a bit smaller then 1/2 inch thick. You don't have to, and you may need to adjust the square size, but for me, this made filling the molds faster then pulling off pieces and trying to keep things uniform.
- Press 1 teaspoonful, or a pre-cut square, of chilled dough into the bottom and up the sides of each well in the pan.
- Bake the cookies for 8 to 10 minutes, until they're browned around the edges. Cool for a few minutes, then push on the thick edge of each cookie to pop it out of the pan. Repeat with the remaining dough.
- While the cookies are cooling, chop your chocolate into small pieces and put into a medium sized bowl.
- Combine the cream butter and honey in a small pot over high heat and stir until the butter has melted and the mixture comes just barely to a simmer, then pour the whole thing over the chocolate.
- Let the chocolate sit for a few minutes and then stir or whisk the mixture until it's uniform, smooth and yummy looking. Add the Nutella and whisk again to completely incorporate.
- Allow the ganache to sit at room temp for a little while to firm up, then spoon some into a piping bag and pipe a little less then a teaspoonful into half the cookies. Let them sit for a few minutes to partially set up, then sandwich a filled half with an unfilled one. Eat. Repeat.

Friday, December 17, 2010

Pretty Teacup for Teatime

Normally, I'm not a big fan of working from home. I know that's weird, but I actually like getting dressed, heading out in the cold, and interacting with coworkers face to face. But when I have to log in at 7am, and I have the option to sleep through the commute time and just roll out of bed, I'm going with the fuzzy robe and slippers routine. While it's too quiet and I'm working straight through lunch, I do get to drink fancy shmancy tea in my pretty tea cups, and that almost makes up for things.

Tea at Home

This is blueberry tea I bought a long long time ago, and while I haven't started baking cookies yet, I make sure to always keep little chocolates at home, just for these occasions.

Tea at Home 2

So in this hectic time of work, holiday shopping, cookie baking, and decoration frenzy, I urge you to take 5 minutes, pour yourself a cup of your favorite tea in the prettiest cup you own, find a cookie or a little treat, and just relax. Just for 5 minutes. Check out this link. Then you can go and wrap the neighborhood in garlands or cover the driveway with tinsel if you like.

Thursday, December 16, 2010

Chocolate Orange Cupcakes

Amidst all the jolly, bright and shiny posts I'm seeing all over the blogosphere these days, I can help but feel a bit like a Grinch. Or rather to be more accurate, like a lump of coal. I really want to like the holidays, I really really do. I love everything about them. The over the top decorations, the carefully wrapped presents, the flurry of warm cookies and hot cocoa. But the best part is that you see all your friends and family, even the ones you haven't seen or heard from in months. Unfortunately, due to the nature of my job, it's also the time of the year when I become a hermit (hence my absence from this blog). The hours are longer and the days are more hectic and I've been trying to get everything in my neglected home back to order during what little spare time I can squeak out of my day. The sun sets almost as soon as it rises so some days I feel like I truly am living in a cave somewhere in the farthest reaches of Siberia. Have you ever felt exhausted even though you've been sitting at a desk all day? That's essentially where I am right now.

I finally got away for a quick dinner with two of my closest friends last night and it was such a great feeling to just sit and chat for a little while without a todo list or somewhere I have to run to next. I want more of that. I want people to drop by for a few minutes and chat over a cup of tea. I want to go outside and make a snowman, or just go for a walk and look at lights. And I want more energy to bake. I keep bookmarking all these recipes and wishing I had the time or the will to try them.

That's not to say that I haven't been baking. I mean what is sleep, after all? No one really needs it, right? So while I don't have festive holiday cookie exchange recipes for you today, I do have these amazingly quick and incredibly easy cupcakes. They have orange zest in them, so they're totally festive. I promise.

Chocolate Orange Cupcake 2

Chocolate Orange Cupcakes
Cake recipe adapted from Martha Stewart and frosting is adapted from Whipped

Cake:

3/4 cup unsweetened cocoa powder
1-1/2 cups all-purpose flour
1-1/2 cups sugar
1-1/2 teaspoons baking soda
3/4 teaspoon baking powder
3/4 teaspoon salt
2 large eggs
3/4 cup orange juice*
3/4 cup buttermilk
3 tablespoons vegetable oil
1/2 teaspoon pure vanilla extract
zest of 1 orange*

1. Preheat oven to 350 degrees. Line standard muffin tins with paper liners; set aside. Sift together cocoa powder, flour, sugar, baking soda, baking powder, and salt into a large bowl. Add eggs, orange juice, buttermilk, oil, vanilla and zest, and mix until smooth, about 3 minutes. Just use a whisk or a spoon and give your KitchenAid a rest this one time. Scrape down the sides and bottom of bowl to assure batter is well mixed.

2. Divide batter evenly among muffin cups, filling each 2/3 full. Bake until tops spring back when touched, about 18 minutes, rotating pan once if needed. Transfer to a wire rack; let cool completely and revel in the fact that you've only really dirtied one bowl and one whisk. Yay for easy cleanup!

Frosting:

24 ounces high-quality milk chocolate (I used Valrhona), chopped
3/4 cup (1 1/2 sticks) unsalted butter, room temperature
2 cups sour cream
1/4 cup light corn syrup
zest of 2 oranges *

Place chocolate in large metal bowl. Set bowl over saucepan of simmering water and stir until melted and smooth. Remove bowl from over water. Add butter and stir until melted, then add sour cream, corn syrup and zest, and whisk until smooth. Let frosting stand at room temperature until thick enough to spread, about 20 minutes. You can also nuke the chocolate in the microwave in 20 second intervals, until it's melted and warm, and save yourself a few extra dishes you won't have to wash. Guess which version I went with?

Frost the cooled cupcakes and enjoy. They're actually better if you keep them in the fridge and serve the next day. The orange flavor permeates the cake and frosting giving both a more pronounced flavor. Just make sure you let them come to back to room temp before eating.

* If you just zest 3 oranges and split the zest between the cake and the frosting, you can squeeze out the oranges and use the juice. It should be enough to make the cake and you won't end up with naked albino oranges getting crusty and neglected on your counter.