Sunday, July 31, 2011

Hello Kitty Macarons on Strawberry Banana Cupcakes

This post is entirely out of order. I have half a dozen other things I've been meaning to tell you about queued up, but this was just too freakin' cute. I know, there's an overabundance of pink in this, which is entirely out of character, but I had an entire batch of macarons with perfect feet on every single shell and not a single casualty! That's unheard of odds for me. Not to mention these have ears and whiskers and bows. The cuteness is overwhelming.

Hello Kitty Macaron Cupcake

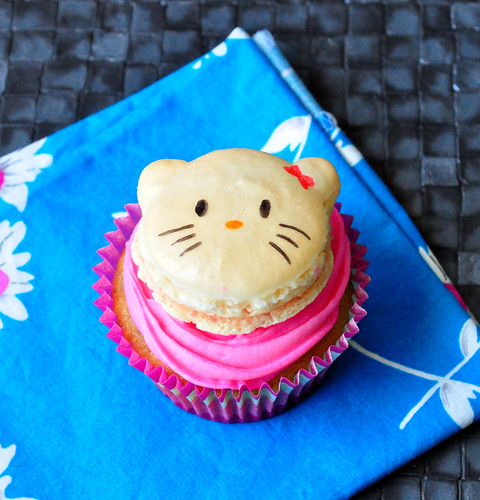
I saw the Hello Kitty macarons at I Heart Baking a long time ago, and I remember mentally filing the idea away for some distant future, and my mental secretary made sure to dredge up the idea when an order came in for Hello Kitty cupcakes. They're not as perfect as hers, but pretty good for a first try. I used the simplest recipe from the macaron queen: Mrs. Tartlette, filled them with the strawberry cream cheese frosting and plopped them on top of the best banana cupcake I've ever made. I sure hope the birthday girl likes them.

Hello Kitty Macaron Cupcake 2

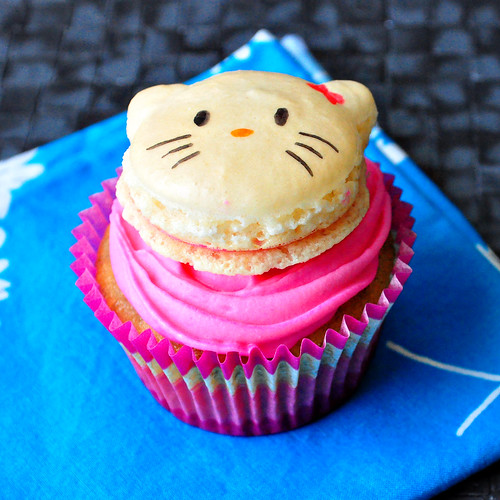
Banana Cupcakes with Strawberry Frosting and Macaron Toppers
I used Tartlette's recipe without any adjustments, so please go over to her site for directions on how to make your own macarons. Just remember to pipe the batter into a slight oval and to give the oval ears, then once they're cool and dry draw on the face with food color markers.
The recipe for the banana cupcakes I adapted from this one from Cake Journal.


125g (4oz) butter, room temperature
175g (6oz) sugar
2 eggs
3 large mashed ripe bananas
2 Tbsp vegetable oil
1 tsp baking soda
2 Tbsp hot milk
1 tsp baking power
225g (8oz) flour

- Preheat the oven to 325F and prepare two cupcake pans with wrappers.
- In a large bowl cream the butter and sugar till light and fluffy.
- Add eggs one at a time.
- Mix the mashed bananas with the vegetable oil and then mix into the butter mixture.
- Warm up the milk in the microwave. Make sure you watch it though or it will bubble up and run out of the cup. Stir in the baking soda, which will foam up, and then mix the foam into the banana mixture.
- Mix in sifted flour & baking powder just until combined.
- Fill cupcake cups halfway and bake for 18-20 minutes until very lightly golden on top and a toothpick comes out clean. Don't overfill the cupcake cups because the batter will rise and overflow, leaving you with a delicious mess that you'll just end up eating on your own. Not good.

Strawberry Frosting

2 8oz packages cream cheese, room temperature
1/2 cup butter, room temperature
1/2 cup strawberry jam, seedless if you can
1/4 cup powdered sugar, or more if you want it sweeter
pink food coloring, optional

- Whip the cream cheese and the butter together until combined and fluffy.
- Add the jam and the powdered sugar and whip until incorporated.
- I used my own jam, which made the frosting a dull pink shade, so I added some pink food coloring to get it to Hello Kitty standards, but you can skip this part if the shade doesn't matter to you.

Thursday, July 28, 2011

Homemade Farmers Cheese

Remember a few months ago when I showed you how to make your own yogurt? Well, this time I have something even easier for you: Homemade Farmers Cheese! I don't know how many of you know what this is, but it's something that I've had quite often growing up. On the weekends my mom would make sirniki, sort of dense cottage cheese like pancakes, that we would slather with sour cream and inhale for breakfast. Or we'd scoop some straight into a bowl, top with sour cream, honey and berries and scarf that up cold. While that's always been really good, this homemade version is even better. What you get from the store is always a bit dry, it really needs that sour cream topping to smooth things out, but the homemade version...I can eat that straight with a spoon.

Homemade Farmers Cheese

It's yet another one of those "one ingredient recipes" since all you'll really need is a great big pot of water and a carton of lowfat buttermilk. I have a feeling that you'd get the same results if you used a plastic jug, but I think you'd have a harder time getting your product out of it, so use the cardboard cartons, they should be easy enough to find.

Step 1: Stuff an unopened carton of buttermilk into a large pot of water. It's okay if the carton floats, but make sure it's otherwise submerged. Don't be afraid to tip it on it's side; since it's not open, you'll be fine.

Step 2: Cover the pot and bring the water to boil. Turn the heat off and leave the pot on the stove undisturbed overnight. Don't touch it, don't even think about it until the next day.

Step 3: Pull out the carton and drain the curds in a colander lined with a piece of cheesecloth. Enjoy!

Homemade Farmers Cheese Plated

For now I've just been eating it with a drizzle of honey and berries, but I think I'll need to tackle my mother's sirniki recipe with the next batch, so stay tuned!

Monday, July 25, 2011

Globe Zucchini Stuffed with Sweet Potato

"50 cents each or fill up a bag for $5" the sign said at the giant cart of zucchini at my farmer's market. I was only planning to grab one or two, but then I saw the variety and I got carried away. I filled the bag up with the regular crookneck and straightneck zucchini, but also piled in a half dozen green globes and as many little pattypans as I could dig out. I'm still debating what to do with the pattypans, but I've had a recipe earmarked for the globes for a few weeks and I knew exactly what I'd be making.

Stuffed Zucchini - Baked 2

I've been on a mission to get more veggies into every day meals, so when I saw the gorgeous stuffed zucchini recipe over at La Tartine Gourmande, I just knew it would be the perfect thing to try. Especially since it was a quick recipe and I'd need to make/eat it fast to make the midnight Harry Potter marathon with my friend. They came out adorable and yummy, even the leftovers were delicious the next day. The lime zest was a great addition and I might even add some of the lime juice into the mix next time. I'll be keeping my eye out for globe zucchini from now on.

Stuffed Zucchini - Baked

Globe Zucchini Stuffed with Sweet Potato
Adapted from La Tartine Gourmande

6 small globe zucchini, green or yellow
1 sweet potato, peeled and diced
2 large shallots, finely chopped
2 garlic cloves, peeled and finely minced
1 tablespoon chopped fresh oregano
2 sprigs of thyme
Sea salt and pepper
Olive oil
Zest of 1 lime, finely grated
2/3 cup finely grated Parmesan
3 slices prosciutto, finely diced
1 egg

Preheat the oven to 375 F and have a large baking dish ready.
Slice a small piece off at the top of each zucchini; set aside. Scoop the flesh out with a spoon, making sure to keep the shells intact. Season shells with salt and pepper. Chop the zucchini flesh; set aside.

In a pot, heat 2 tablespoons olive oil over medium heat. When warm, add the shallots, lime zest and thyme. Sweat for 4 minutes, stirring occasionally. Add the garlic and continue to cook for 2 minutes.

Add the sweet potato and cook for 5 to 7 minutes. Add the zucchini flesh and cook for 5 more minutes. Transfer to a bowl and stir in the prosciutto, oregano, cheese and egg. Season with salt and pepper, and discard the thyme.

Stuff the zucchini shells with this mixture. Place the top on each zucchini and place them in the oven dish. Drizzle generously with olive oil and add 1/4 cup cold water at the bottom of the dish. Bake the vegetables for 45 to 50 minutes, or until the shells are tender when pierced with a small knife.

I served these on top of a pile of spicy quinoa, but you can also serve with rice, or whatever else you like.

Wednesday, July 20, 2011

Garlic Scape Lemon Pasta

I had only heard of garlic scapes before I saw them a few weeks ago at my farmers market. There were just two lonely basketfulls left and they were cheap, so I ran up, despite already buying way more then I had intended to, and scooped them up. I had no clue what the heck to do with them, I'd only remembered seeing recipes for pickled scapes before. My recent pickling experiment resulted in beautiful jars of entirely inedible beets, so I was weary of trying anything with vinegar anytime soon, so I searched the web until I found a recipe I felt safe with.

Garlic Scapes 2

But then what part do you use? Garlic scapes are essentially wild baby garlic. The bulb is just beginning to form and the green stem has a lovely floral and mild garlicky flavor. The bulbs on mine were quite a bit fuller then the ones I saw in pictures, and most recipes said to just use the stem, but when I peeled open the bulbs I saw these beautiful baby garlic bundles, so I peeled off the top skin and chopped up the bulbs too.

Garlic Scapes Closeup

Garlic Scapes

The recipe I had settled on was for a very simple pasta dish from from Food Republik that would allow the scapes to shine, backed by tender spaghetti and brightened by a touch of lemon. I topped it with a light shower of Parmesan and ground black pepper and called it dinner.

Garlic Scape Lemon Pasta 2

On a slightly different topic, I have a request for you guys. It turns out that I'm seriously behind on my pop culture. There are a ton of movies that people talk about on a daily basis that I'm absolutely clueless about. In this stifling heat, I rarely feel like venturing out of my air conditioned home, so I signed up for Netflix (before their incredibly greedy price hike announcement, which is a rant for another day) and I'm slowly trying to catch up, but aside from a few things I know I wanted to see, I'm at a loss of where to start. So if you found your way here, please drop me a line and let me know what are your favorite movies, and books for that matter as I'm always looking for great recommendations. Thanks!

Garlic Scape Lemon Pasta

Garlic Scape Lemon Pasta
adapted from Food Republik

About 1 ½ cups garlic scapes, stems chopped into 2-inch pieces and bulbs minced
2 cloves of garlic, minced
1/2 pound pasta
1 tbsp butter
2 tbsp olive oil
juice of 1 lemon
1/4 cup shaved Parmesan cheese
salt and pepper

Cook the pasta as you normally would until it's al dente. Drain and reserve a cup of the pasta water.

Heat the olive oil in a skillet over medium-high heat. Add the chopped garlic scape stems and stir fry about 3-4 minutes until they're almost tender. Add minced garlic and minced scape bulbs and the butter and stir fry another 2 minutes until the minced parts are lightly golden. Stir right into the drained pasta, add lemon juice, some salt and a hearty shower of freshly ground pepper. Add a bit of the reserved pasta water if pasta is dry. Taste for seasoning and adjust if desired. Top with shaved Parmesan and serve immediately. It also reheats beautifully making for some very tasty leftovers.


UPDATE: It was pointed out to me that I may have misspoken about what exactly a scape is, so I went to wiki and I pulled out this wonderful quote: "The [garlic] plant often forms strange curling stalks, or 'scapes', with odd nodules called umbels. These rococo growths contain their own minicloves called bulbils, a term that sounds like a playground insult." So I guess garlic is really the root and scapes are what grows out of the ground...and generates something that looks almost exactly like the root yet again. What a complicated creature!

Friday, July 15, 2011

Guinness Stout Brownies

"You're bringing Guinness Brownies!" I was told. Nevermind that I had never made such things before, I was left with no room for argument. Not that I complained, I'm always happy to try something new and actually having the decision made for me left me with a calm sense of contentment, where without such instructions I would have been left waffling over what to make for at least a week.

Guinness Brownies 2

I did a search and discovered that for the most part there is really only one recipe out in the internet world for Guinness brownies, but it left a bit of room to play with. For one, there was a lot of liquid in the ingredient list, but I couldn't imagine a mere cup of beer showing itself through the dense chocolate flavor. My only contribution to the recipe was to triple the amount of beer and then just reduce it to the called for amount.

Guinness Brownies

They came out so good that one didn't quite make it to the party.

Guinness Brownies Tray

I mean someone had to make sure that they were good before inflicting them upon the masses, right? And who am I to shirk such weighty responsibilities? I dubbed myself "Inspector 27" and left the tell-tale label.

Guinness Brownies Inspected

Guinness Stout Brownies
Adapted slightly from here

1 cup all-purpose flour
3/4 cup unsweetened cocoa
1/4 teaspoon salt
6 tablespoons unsalted butter, cut into cubes
8 ounces dark bittersweet chocolate, chopped
3/4 cup white chocolate, chopped
4 large eggs, at room temperature
1 cup sugar
2 bottles Guinness Extra stout beer
3/4 teaspoon vanilla
1 cup mini semi-sweet chocolate chips

- Preheat the oven to 375 degrees F. Line a 9 x 13-inch baking pan with nonstick foil, or regular foil, lightly greased.
- Pour both bottles of beer into a medium saucepan, and simmer on medium heat until it's reduced down to 1 1/4 cups. If you keep a glass measuring cup nearby, you can check the progress when you think you're close. It should take about 15 minutes. Leave the beer on the side to cool.
- In a medium bowl, whisk together flour, cocoa, and salt until evenly combined.
- Melt butter, bittersweet chocolate and white chips in a double-boiler over very low heat, stirring constantly until melted. Remove from heat. (You can also do this in the microwave, heating it on high and stirring every 30 seconds).
- In a large mixing bowl, beat eggs and sugar on high speed until light and fluffy, about 3 minutes. Add melted chocolate mixture, beating until combined.
- Beat reserved flour mixture into melted chocolate mixture. Whisk in the reduced beer mixture and the vanilla. The batter will seem a bit thin, but it will be perfect. Pour into the prepared baking pan and drop semisweet chocolate chips evenly on top of batter.
- Bake 20 to 25 minutes on center rack in the oven, until a toothpick inserted in the center comes out almost clean. (The original recipe cites a longer time, but I found that mine were ready sooner. It might just be my oven so leave it in a few extra minutes if you think it needs it).
- Let brownies cool, uncovered, to room temperature. Dust with confectioners' sugar if you want before serving.


P.S. Please excuse the antiquated grammar, I'm currently reading "A Journey to the Centre of the Earth" by Jules Verne and I guess the language style is infectious. I can't believe I haven't read this book before though, it's really good and is leaving me with a strong urge to travel to Iceland.

Wednesday, July 13, 2011

Summer Peach and Sour Cherry Crumble

I do believe my house is cursed. For the second time in the last few weeks a short, but insanely violent storm has caused me (and to be fair, thousands of other people) to lose power for over 24 hours. Every time I fill the fridge, I must empty it all out again. I've started to seriously consider living off of ramen until storm season is over. On the other hand, fresh fruit and veggies barely need refrigeration, so maybe I should just live off of them. Yep, that's a much better plan.

Peach and Sour Cherry Cobbler 2

Under normal circumstances, I'm a cake for dessert kind of a girl. I like layers, different fillings, elaborate frostings, and the amazingness that comes when all components play nice with each other. These days though I'm all about "toss it in and leave it alone" school of dessert thought, which is why I'm absolutely nuts over this crumble recipe. I remember looking through a bunch of recipes, but when it came time to bake I just threw some stuff together, shoved it into the oven and went back to "cleaning". Cleaning, by the way, entails pulling everything out of the giant closet in the living room, trying to discard items not used in years but then carefully putting everything back because "I might need it some day". Sigh. Less is more was never my philosophy.

Peach and Sour Cherry Cobbler

Summer Peach and Sour Cherry Crumble

1 cup flour
1/2 cup sugar
1/2 cup brown sugar
1 cup old fashioned oats
1/2 tsp salt
1/2 tsp cinnamon
1 stick (1/2 cup) cold butter
6 or 7 quartered peaches
1 cup pitted sour cherries

- Preheat oven to 375F
- Combine the first 6 ingredients in a bowl and stir together thoroughly. Take 1/2 a cup of the dry mix and in a separate bowl mix it together with the fruit.
- Dump the fruit into a 9x9 deep glass or ceramic dish and set aside.
- Cut up the butter into small pieces and dump into the bowl with the remaining dry mix. Work it in with your hands to make the crumble. Try to incorporate all the butter and not leave too many floury patches. This will be the yummy butter stuff on top and you will want it to be good. Spread the crumble evenly over the fruit.
- Shove the dish into the oven and bake until the crumble on top is nice and golden. This should take approximately 40 minutes. If you used frozen fruit, no worries, just add 10 minutes to the baking time.
- Scoop into bowls and eat...or top with a scoop of vanilla ice cream for an extra special treat.

Wednesday, July 6, 2011

Vin de Noix or Green Walnut Wine Cordial

It might be a bit too late to post this, green walnuts in their proper stage of tender vulnerability are probably pretty hard to come by now, but I urge you to join me in this experiment or at the very least bookmark this for next year. I don't remember how I stumbled onto a recipe for Nocino, but once I did I was intrigued. I scoured the web for everything even remotely having to do with Green Walnuts, which incidentally are not an exotic breed or a rare variety, but simply regular walnuts picked before they mature, just before they start to develop their hard shell. I have never seen them in stores or markets so I went on a hunt, finally finding Local Harvest, a site that allows small farms across the US to sell their products in one spot without the extra overhead of hosting a website and trying to generate traffic to it. Kind of genius actually. One of the farms associated with them is Clary Ridge Ranch, and that's where I ordered from. They came super fast, lovingly packaged with an ice pack and a few walnut branches:

Green Walnuts Box

After doing some research I learned that June 24, also known as St. John's Day, is the day when people in Calabria and throughout Italy collect walnuts, sometimes going as late as Bastille Day (July 14th), but the general tradition specifies that the green walnuts must be picked on this day to make the best liquor.

Green Walnuts

I unpacked the box, snapped a few shots, counted out the walnuts and got to work. I have a double batch of Nocino going as well as a batch of Vin de Noix. They won't be ready to drink until sometime around Christmas, but sharing with you then what I'm making now seems mean and braggy. I made Nocino exactly as it's listed here, changing nothing except doubling the recipe, and quite frankly, the infamous David Lebovitz has never steered me wrong with a recipe. The Vin de Noix on the other hand, I couldn't help but mess with. I merged several recipes that I found, so what I'm sharing with you here is sort of my own take on it. I'm keeping my fingers crossed hoping I didn't mess anything up.

Green Walnuts Closeup

One thing that everyone agreed on was that you absolutely must wear gloves and cover your entire work area while you're cutting up the walnuts. They may look innocent and green, but given a little time their juice turns dark brown and stains everything that hasn't been wiped down in time. Don't say I didn't warn you.

Here it is on Day 1, and I'll be occasionally posting updates on how it's doing:

Vin de Noix

Vin de Noix

50 green walnuts, rinsed and quartered
750 mL bottle of brandy, or vodka. The cheap stuff will do just fine.
5 liters red wine, this is a "commoner" recipe, so a nice but cheap red will do.
1 kg sugar (2 pounds)
12 walnut leaves, add these if you have them, but I have a feeling they're non-essential
Peel of 1 lemon, make sure to get just the yellow part, the white pith is bitter.
6 whole cloves
2 sticks cinnamon
1 vanilla bean, split

1. Stir together all of the ingredients in a 5 gallon glass jar with a tight fitting lid. You want it to be non-reactive because the alcohol could eat away or react badly with metals or plastic. Store in a cool dark place for 6 to 8 weeks, shaking occasionally. Don't forget to put a label on the jar with the date so that you know when to check it for readiness.
2. Strain through a few layers of cheesecloth into a bowl or another large container. Taste, and adjust the sugar if you want it sweeter. Bottle and store in a cool dark place letting the flavors mellow and develop for a month or three. It should be ready to drink/share around the holidays.

I'll be keeping my fingers crossed hoping that everything comes out good. I've been sniffing both jars and so far the smells are promising.