Monday, June 14, 2010

German Chocolate Cake


How could I have possibly gone this long without ever even trying to make a German Chocolate cake? It's such a popular cake that you can always find it behind the glass of any decent sized bakery and yet it never even crossed my mind as I flipped through the recipe pages of a new book or in my head, thinking up the next experiment. Well, all that changed this weekend. There was a surprise 50th birthday in the works and my friend asked me to help out, so along with a giant batch of coleslaw and a tub of meat balls, I'd also be bringing a huge cake. And the birthday girl's favorite was German Chocolate and birthday girl gets what birthday girl wants. No wiggle room. So I set out to find the ultimate recipe and once again, I found the most promising one written up by David Lebowitz.

German Chocolate Cake

Since it was my first time making this cake I decided not to mess with it, so aside from doubling the recipe, I left well enough alone and got started as soon as I got home from work on Friday. The cake layers came together quickly and with a minimum of fuss and came out of the oven looking fantastic. And that's about where my luck ran out. I made the coconut filling, bringing the mixture to the specified temperature, mixing in the nuts and coconut and setting it aside to cool, and theoretically to thicken as well. But as the clock ticked by and the night got later and later, the mixture stayed thin and runny. Uh oh.

"Just a few more minutes" I thought, as I got started with the chocolate icing, but as that was sitting in a bowl cooling, my patience wore a bit thin. I dumped the filling back into the pot and set it back to cook, bringing it up to 200F this time. I added an extra half a cup of coconut and an extra half cup of nuts and once again set it aside to cool. Half hour later it was perfect and I breathed a sigh of relief.

Cake layers cut, drizzled with syrup, spread with filling and carefully stacked, I turned to my icing, only to find that it too betrayed me by staying much too runny to spread. This time I figured the fix would be much easier. I melted another 4 ounces of chocolate and carefully folded it in. A few minutes later it was perfect, but by this time the clock was chiming midnight. The cake iced and stored in the fridge, I tossed all the bowls in the sink and stumbled off to bed. The cake came out great, and I have learned what to look for in terms of "doneness" next time, so all in all the experiment was a success (at least according to the birthday girl), even if it did cut into my sleep time.

German Chocolate Cake 2

German Chocolate Cake
One big, tall 9-inch cake; about 16 servings
Adapted with minimal adjustments from David Lebowitz


For the cake:
2 ounces semisweet chocolate chopped
2 ounces unsweetened chocolate, chopped
6 tablespoons water
8 ounces (2 sticks) unsalted butter, at room temperature
1 1/4 cup + 1/4 cup sugar
4 large eggs, separated
2 cups all-purpose flour
1 teaspoon baking powder
1 teaspoon baking soda
½ teaspoon salt
1 cup buttermilk, at room temperature
1 teaspoon vanilla extract

For the filling:
1 cup heavy cream
1 cup sugar
3 large egg yolks
3 ounces butter, cut into small pieces
1/2 teaspoon salt
1 cup pecans, toasted and finely chopped
1 1/3 cups unsweetened coconut, toasted

For the syrup:
1 cup water
3/4 cup sugar
2 tablespoons dark rum

For the chocolate icing:
10 ounces bittersweet or semisweet chocolate, chopped
2 tablespoons light corn syrup
1 1/2 ounces unsalted butter
1 cup heavy cream

1. Completely cover two 9-inch cake pans with wax paper and spray with Pam, the one with flour in the mix. Preheat the oven to 350°.
2. Melt both chocolates together with the 6 tablespoons of water in a glass bowl in the microwave, stirring at 15 second intervals. You can also use a double-boiler, but I feel it involves too many dishes to wash. Stir until smooth, then set aside until room temperature.
3. In the bowl of an electric mixer, or by hand, beat the butter and 1 1/4 cup of the sugar until light and fluffy, about 5 minutes. Beat in the melted chocolate, then the egg yolks, one at a time.
4. Sift together the flour, baking powder, baking soda, and salt.
5. Mix in half of the dry ingredients into the creamed butter mixture, then the buttermilk and the vanilla extract, then the rest of the dry ingredients.
6. In a separate metal or glass bowl, beat the egg whites until they hold soft, droopy peaks. Beat in the 1/4 cup of sugar until stiff.
7. Fold about one-third of the egg whites into the cake batter to lighten it, then fold in the remaining egg whites just until there's no trace of egg white visible.
8. Divide the batter into the 2 prepared cake pans, smooth the tops, and bake for about 45 minutes, until a toothpick inserted into the center comes out clean. (Check it at 35 minutes if you're using pans bigger then 9", you don't want the cake to dry out too much or burn).

Cool cake layers completely and while the cakes are baking and cooling, make the filling, syrup, and icing.

To make the filling:
1. Mix the cream, sugar, and egg yolks in a medium saucepan. Put the 3 ounces butter, salt, toasted coconut, and pecan pieces in a large bowl.
2. Heat the cream mixture and cook, stirring constantly (scraping the bottom as you stir) until the mixture begins to thicken and coats the spoon (an instant-read thermometer will read 190°.)
3. Pour the hot custard immediately into the pecan-coconut mixture and stir until the butter is melted. Cool completely to room temperature. (It will thicken.)

To make the syrup:
In a small saucepan, heat the sugar and water until the sugar has melted. Remove from heat and stir in the dark rum. Don't drink it, no matter how good it smells. I promise, there will be some left over for spiking cocktails.

To make the icing:

1. Place the 10 ounces of chopped chocolate in a bowl with the corn syrup and 1 1/2 ounces of butter.
2. Heat the cream until it just begins to boil. Remove from heat and pour over the chocolate. Let stand one minute, then stir until smooth. Let sit until room temperature.

To assemble the cake:
Remove the cake layers from the pans and cut both cake layers in half horizontally, using a serrated bread knife.
Set the first cake layer on a cake plate. Brush well with syrup. Spread 3/4 cup of the coconut filling over the cake layer, making sure to reach to the edges. Set another cake layer on top.

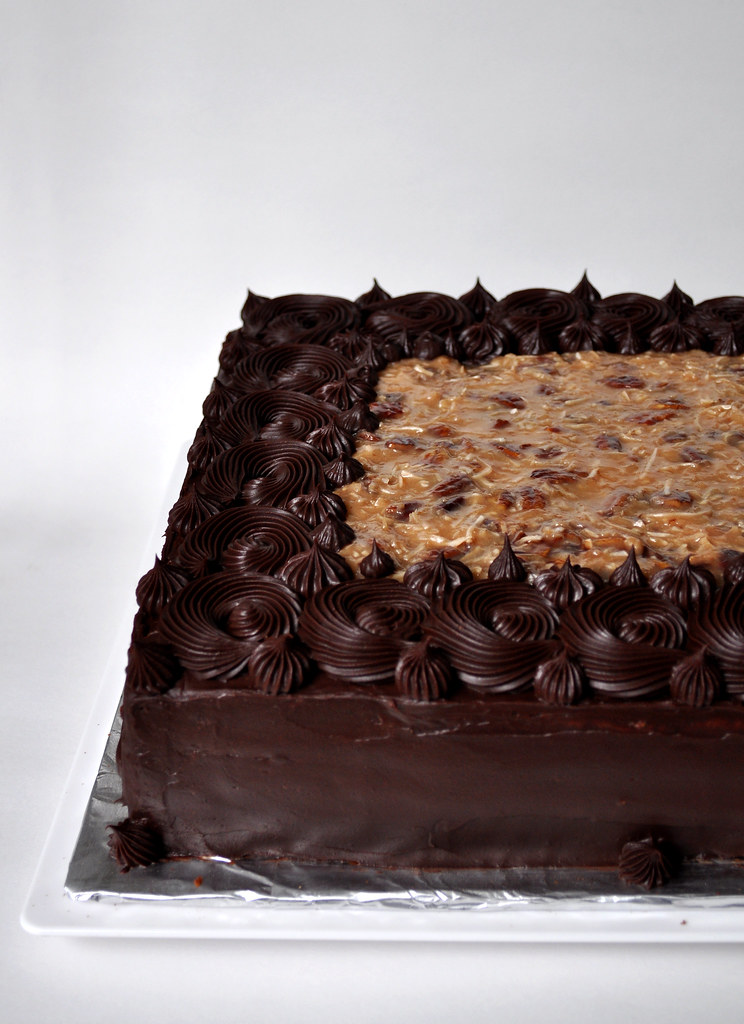
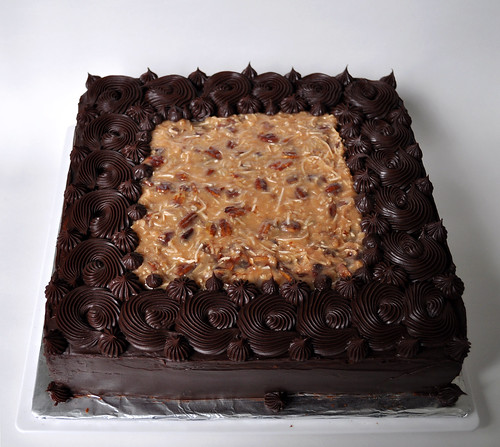
Repeat, using the syrup to brush each cake layer, then spreading 3/4 cup of the coconut filling over each layer, including the top. (I only had a little topping left for the top, so I just made the chocolate border wider to compensate, so no worries if you run low).

Ice the sides with the chocolate icing, then pipe a decorative border of chocolate icing around the top, encircling the coconut topping. I find that cakes that you add syrup to get better on the 2nd day, so make this the night before and store in the fridge overnight.

Wednesday, June 9, 2010

Righting the Balance the Only Way I Know How

Have you seen "Failure to Launch"? It was entertaining, but certainly not the best movie ever. If you saw it though, do you remember how Tripp disrupted the balance of nature and was therefore punished over and over? An otherwise peaceful dolphin bit him, so did a lizard, and I'm sure there was more, but the point is that I believe that something I've recently done, or haven't done, have tipped the scales against me too. Except instead of nature, I think I've angered the household gods. Is it because I'm finally getting time to sort through my mountains of stuff and things are finally starting to look organized? I don't know, but every time I step through the front door these days, I pause and take a minute to listen intently to the "noises" just so I know what disaster is waiting for me that day. I'll spare you the details, those that know me have already heard way more then I'm sure they wanted to about my problems, suffice it to say I'm ready to repent.

I offer this pie as a peace offering, and a not-so-subtle hint. And while it doesn't look like much, it was pretty tasty. The molasses flavor wasn't too strong and the texture was nice and moist. I'm ready to let bygones be bygones, just please please please, let things be back to normal again.

Shoo Fly Pie 1

Shoo Fly Pie
via Martha Stewart
Makes one 9-inch pie

Crust:
• 1 1/4 cups all-purpose flour
• 1/2 teaspoon salt
• 1/2 teaspoon sugar
• 1/2 cup cold unsalted butter, cut into 1/2-inch pieces
• 1/4 to 1/2 cup ice water

Pulse flour, salt, and sugar in a food processor. Add butter; pulse until mixture resembles coarse meal. With machine running, add ice water in a slow, steady stream just until dough holds together, no longer than 20 seconds. Wrap in plastic; refrigerate 1 hour to overnight.

Filling:
• 1 cup all-purpose flour, plus more for work surface
• 1/2 cup packed light-brown sugar
• 1 teaspoon ground cinnamon
• 1/2 teaspoon freshly grated nutmeg
• Salt
• 6 tablespoons cold unsalted butter, cut into 1/2-inch pieces
• 1 cup boiling water
• 1/2 cup unsulfured molasses
• 1/2 cup light corn syrup
• 1 teaspoon baking soda
• 1 large egg, lightly beaten

- Roll out dough on a lightly floured work surface to 1/8 inch thick. Fit dough into a 9-inch pie plate. Trim edges to leave a 1-inch overhang; fold edges under, and crimp with your fingers. Freeze pie shell 30 minutes or overnight.
- Preheat oven to 325 degrees. Whisk together flour, brown sugar, cinnamon, nutmeg, and 1/4 teaspoon salt in a medium bowl. Add butter, and work mixture through your fingers until it forms fine crumbs; set crumb topping aside.
- Stir together boiling water, molasses, and corn syrup in a medium bowl. Whisk in baking soda, egg, and a pinch of salt. Pour molasses mixture into prepared pie shell. Scatter crumb topping over filling. Place pie on a rimmed baking sheet. Bake until filling is set and topping is deep golden brown, about 50 minutes. Let cool on a wire rack 30 minutes.

I thought I had a crust in the freezer when I started making this, but I think I used it up already, so in a rush I poured the filling into mini chocolate graham cracker crusts, and that worked fine, but next time I think I'll make it in the crust as the recipe stated.

Serve with a scoop of vanilla ice cream and hope that tomorrow will bring sanity and peace of mind.

Tuesday, June 1, 2010

Bakewell What?


I hope you've all had a wonderful and relaxing Memorial Day weekend! There's nothing better then an extra day off work...unless you love your job, in which case I'm sure you still had fun. I spent the day at my parent's house where they unintentionally attempted to recreate the experience of a traditional churrascaria. While my dad whipped up lamb, chicken and pork kebabs on the grill, my mother, worrying about possible rain, roasted up a rack of lamb in the oven. Add to that three watermelons (everyone brought one worrying there wouldn't be enough) and enough dessert to send a person into a sugar coma, and you'll have an idea of what my Monday afternoon looked like.

Wanting to contribute, along with my watermelon contribution, I decided to make a Bakewell tart and use up the last jar of last summer's strawberry jam. This was a baking challenge a few months ago for the Daring Bakers and I had everything needed on hand, which made it perfect for a last minute treat. I used Tartlette's version of the tart, swapping the jams and simplifying the crust process by using a food processor. When making tarts, you can't go wrong with a recipe from someone who named her blog after them, and I think they turned out fantastic. I did have a hard time trying to explain to my family what the heck they were though. I mean isn't it sort of preposterous to say that the tarts are baked well? It's not like they're ruined steaks or something. Otherwise, it was a very easy and a very quick recipe to make, and I think wrapped up in a bit of wax paper, they'd make great "to go" treats to share. Leave the explanations for some other day.

P.S. I'd have shown you the beautifully layered inside of the tarts, but they disappeared pretty quickly, so you'll just have to make them yourself.

Bakewell Tart


Strawberry Bakewell Tarts
adapted from Tartlette

Notes: I'm listing the measurements and steps as I used them, but feel free to check out her instructions if you wish. I'm starting to prefer to weigh everything instead of going by cups/teaspoons.

Makes six 3-inch, two 2-inch, and one 6-inch tart...or 10 3-inch tartlettes

Sweet shortcrust pastry:
8oz all purpose flour
1oz sugar
1/2 tsp salt
4oz (1 stick) unsalted butter, cold
2 egg yolks
1/2 tsp almond extract (optional)
1-2 Tbsp cold water

Frangipane:
4.5oz unsalted butter, softened
4.5oz icing sugar
3 eggs
1.2 tsp almond extract
4.5oz ground almonds (or other nut of your choice)
1oz (2 Tbsp) all purpose flour

Jam or preserve of your choice (I used homemade strawberry jam)

Prepare the dough:
Sift together flour, sugar and salt into the bowl of a food processor. Cut up the cold butter into small cubes and dump into the bowl. Using just a few quick pulses, incorporate the butter into the flour until the mixture resembles bread crumbs. Set aside. Lightly beat the egg yolks with the almond extract (if using) and quickly mix into the flour mixture. Pulse two or three times. Keep pulsing while dribbling in the water, only adding enough to form a cohesive and slightly sticky dough.
Form the dough into a disc, wrap in saran wrap and refrigerate for at least 30 minutes.

Prepare the frangipane:
Cream butter and sugar together for about a minute or until the mixture is very light in color and very fluffy. Scrape down the side of the bowl and add the eggs, one at a time, beating well after each addition. The batter may appear to curdle, but it's okay, it'll come back together. After all three are in, pour in the almond extract and mix for about another 30 seconds and scrape down the sides again. With the beaters on, spoon in the ground nuts and the flour. Mix well. The mixture will be soft, keep its slightly curdled look (mostly from the almonds) and retain its pallid yellow color.

Assemble the tartelettes:
Place the chilled dough disc on a lightly floured surface. If it's overly cold, you will need to let it become acclimatised for about 15 minutes before you roll it out. Flour the rolling pin and roll the pastry to 5mm (1/4”) thickness, by rolling in one direction only (start from the center and roll away from you), and turning the disc a quarter turn after each roll. Don't worry too much if it rips, you wan always just fix it up in the molds. When the pastry is to the desired size and thickness, transfer it to the tart pans, press in and trim the excess dough. Patch any holes, fissures or tears with trimmed bits. Place the tarts on a baking sheet line with parchment paper and chill in the freezer for 15 minutes.

Preheat oven to 400F. Position a rack in the center of the oven.

Remove shells from freezer, spread as even a layer as you can of jam onto the pastry base. Top with frangipane, spreading to cover the entire surface of the tart or the jam will escape and burn. Smooth the top and pop into the oven for 30 minutes. Five minutes before the tart is done, the top will be poofy and brownish. Eat them warm or at room temp. Either way, they're great.