Thursday, December 24, 2009

The Last Peaceful Day


The perfect "time out"
It's hard to find a minute to yourself to just relax and enjoy a moment of freedom around this time of the year, so I went ahead and saved my last 15 minutes of peace to pull out whenever I want and remind myself that despite the dark and sleet and gloom outside, the sun will eventually return. And despite the chaos that is my life, I will get another "ohmmmm" moment like this one soon. As you can see from the date on the "Time Out" magazine (get it? Time out? okay, well, I thought it was appropriate), this was a few weeks ago, but seeing this picture reminds me exactly how I felt in that moment. I had no where to be and nothing that needed doing. I could enjoy the amazing mocha I bought at Julius Meinl (my favorite coffee shop) and the perfectly fragile almond cream croissant that shattered into sugary fragments as soon as I bit into it. I could read through the whole magazine without falling asleep or any interruptions.

So, my wish to all of you in the upcoming year is this: May you all have more moments of utter bliss this year and may you have the time to enjoy them.

Crumbs

Wednesday, December 23, 2009

Pre-Holiday Dog Days


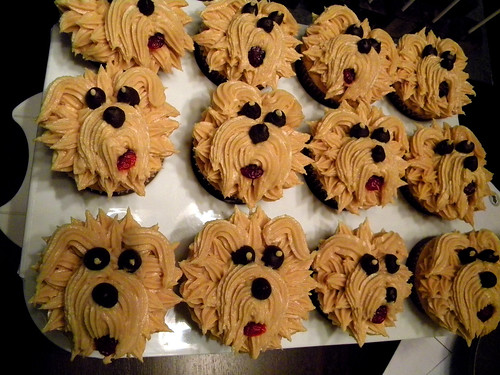
These days I find myself making a huge conscious effort NOT to become a Scrooge. Working in the gift card business, the last few weeks have been rather hectic, to put it mildly, and with all the overtime I've been putting in I've had no time whatsoever to bake any of the wonderful things that have been popping up all over the web. But like I said, I'm making an effort, even if that means I get no sleep. A few weeks ago a friend asked me to bake something for her friend's 30th birthday and even though I know I technically should not take up any projects and take it easy, I felt like it's been too long since I've been able to bake something fun, so I said yes. Her friend loves dogs, so I offered to make her a tower of puppy cupcakes.

Peanut Butter Cupcakes
The cupcakes themselves are peanut butter and they're filled with dark chocolate ganache, but my favorite part was the frosting, so I'm going to share the super easy recipe with you below. I didn't want to use marshmallows or candy, so I just piped frosting into the shapes I wanted and used the leftover ganache for eyes and nose. Here is what the cupcakes looked like when I was boxing them up.

Puppy Cupcakes
Yummy Peanut Butter Frosting
For a smoother frosting that blends easily, keep all ingredients at room temp.

1 cup creamy peanut butter
1 8oz package cream cheese
1 stick (4oz) softened unsalted butter
3 cups powdered sugar
4 tbsp heavy cream

Cream the first three ingredients in a stand mixer until smooth, light and evenly blended. Add the sugar and mix to distribute evenly adding the cream a tablespoon at a time until the desired consistency is reached. You might need more cream if the frosting is too stiff or more sugar if you went a bit overboard with the cream, and enjoy!

Friday, December 4, 2009

Happy Belated Pie Day

Now I know that it's over a week since Thanksgiving, but this is Pie season people! I may have missed sharing my coma fest with you during that hectic week, but I had to share my newly found love of simplicity. I've never been a fan of the "easy" recipe. I've always been one of those crazy people that will complicate the heck out of a glass of water, but pie...well, a pie made with love and fresh ingredients doesn't need much. The beauty of it is that it doesn't even have to be pretty. When confronted with a slice of warm pie that has fallen apart in transit from the pie dish to the plate, the wreckage hastily covered by a scoop of ice cream, the grateful guest won't even pause before digging in. Presentation is entirely forgotten in that blissful combination of sweet and tart, warm and cold, tender and flaky deliciousness. The only question remaining is "Is there more?"

Apple Blueberry Pie

Easy Pie Crust Recipe
I think I pulled this recipe from Real Simple, but I've been trying to clean out my huge pile of magazines, pulling out just the recipes, so unfortunately I can't give full and proper credit. This will make just the bottom crust, you'll make an even easier crumbly topping to go over the fruit

1 1/4 cup flour
1/2 cup (1 stick) cold unsalted butter, cut into small cubes
1 tablespoon sugar
1/2 teaspoon kosher salt
2 to 3 tablespoons ice water

Combine first 4 ingredients in a food processor and pulse until it's roughly crumbly. Leave the top opening of the food processor open and drizzle in the water a bit at a time, pulsing once or twice to distribute. You want the mixture to still be a bit crumbly, but hold together when squeezed, but not get gummy. If you overdo the water, just add a bit of flour, but try not to process to much or the dough will be tough.
Place the mixture onto a large piece of saran wrap and shape into a thick disk, wrapping the whole thing tightly in the process. Chill in the fridge for at least an hour up to three days. If you're making the pie today though, don't bother washing the food processor yet...you'll need it again at the end.
Take the dough out of the fridge when you're ready and flour your rolling pin and work surface. A large sheet of parchment will make moving everything easier, but you can just work on the counter top if you wish. Roll the dough into a large disk about 11 inches in diameter. Loosen the dough and carefully transfer onto the dish. If you don't mind flour all over and if you used parchment, you can try and just flip the whole thing into the pan if you want...but if when that fails and your dough still rips, you can just patch it up in the dish. It'll be covered in fruit anyways, no one will know.
Carefully tuck the dough hanging over the edge under to create a rim and pinch all around to "flute" the rim.
Voila! You have pie crust, ready to be filled. Just pop the dish into the freezer until you're ready to use it. Actually, you can wrap the whole thing in saran wrap and freeze this for up to two months if you want, but why wait when the rest of the process is so easy an delicious?

Apple and Blueberry Filling

4 medium firm apples, granny smith work great, but pretty much any variety will do
2/3 cup sugar
2 tablespoons flour
2 teaspoons cinnamon
2 teaspoons lemon juice
2 tablespoons melted butter
a few handfuls of fresh or frozen blueberries

Preheat the oven to 375F. Peel, core and slice the apples. Dump into a large bowl and top with the remaining ingredients. Cover with another bowl, large plate or lid that fits snugly with no gaps, and holding it on tightly pretend you've got maracas and shake shake shake. I suppose you could just stir the whole thing up with a spoon or spatula, but that's not nearly as fun. Dump the mess into the crust and top with...

Easy Crumbly Topping

1/2 cup flour
1/4 cup sugar
2 tablespoons brown sugar
1 teaspoon cinnamon
1/4 teaspoon salt
3 tablespoons cold butter, cut into small cubes

Process in the food processor until crumbly. Spread evenly over the pie. Don't worry if it looks like it's too much. It will help soak up some of the fruit juice and won't seem like too much at the end.

Put the pie dish onto a cookie sheet to make it easier to handle and to catch any overflow if the fruit was really really juicy, and pop into the hot oven for an hour, or until the crust has browned and the apples are cooked through.

If you're feeling particularly adventurous, you can also whip up this Honey Lavender Ice Cream to put on top, which is what I did. I told you, I can't do "easy". But if you're not nuts like me, plain vanilla will work just as well.

Apple Blueberry Pie

Wednesday, December 2, 2009

Katie's Wedding and an Afternoon in Milwaukee


First, a quick note: I ordered a new laptop, so as soon as it's set up, you will no longer needs to wait for weeks to see an update here. Yay!

It's been over a week now, but I'm finally getting around to sharing with you guys the cake I made for my friend Katie's wedding. But before we get to that, I have a question. Have you ever walked around a seemingly large city, that feels like it's teeming with people, and yet there's not a soul on the streets? That's exactly how I felt when I went for a walk through Milwaukee, WI after setting up the cake. It felt very surreal. I couldn't help thinking that there was a huge party or something going on 10 miles away and that's where everyone was and I just didn't get the memo since I'm from out of town. It did give me a great chance to take some nice pictures and since the sun sets early these days, the light couldn't be more beautiful. This is the view from just outside the hall where the wedding was held. I love gazebos and in that golden light moment, it felt like it would be a very romantic spot to be. I couldn't help but play with the picture a bit. Doesn't it look like the city in miniature?

Tiny Milwaukee - Gazebo

Anyhow, onto the wedding. It was beautiful! The flowers, the settings, the bride, gorgeous. Even the people couldn't be nicer and I found many of Katie's friends and family to chat with. The food? Fabulous...which brings me to the cake :D (that was a smooth segway, don't you think?) If you remember from my post several months ago, Katie picked a white chocolate cake, with white chocolate ganache, blackberries and a lemon buttercream. The blackberries were to go with the lovely floral arrangements that she picked and the florist would be providing the flowers to decorate the cake, so my job would be to just bake and deliver. I don't know why, but I couldn't for the life of me remember how big she wanted the cake to be, all I remembered was her fear of tiered cakes with pillars. Something about them crashing. Silly Katie :D But since I couldn't remember, I just followed the picture she sent me showing a 4 tier cake...which turned out a little bit higher then I anticipated...okay a LOT higher. No matter. Wedding cakes are supposed to be large and impressive. They always put them on those huge tables and anything smaller than huge gets lost on it, so while it wasn't exactly what she intended, I think she was happy with the results. And in my humble opinion, it tasted even better then I remember it from the tasting. I won't even tell you how many pounds of chocolate, how many dozen of eggs, how many cases of butter, or how many tubs of berries went into it (and the backup sheet cake that was to stay in the kitchen). I'm still slightly amazed that it fit in my fridge. Isn't it pretty though?

Katie's Cake

Side note: Driving on the highway with this cake as my passenger was a nerve wrecking experience...I don't know how those people on Ace of Cakes do it.

Wednesday, November 18, 2009

Coconut Cookies - Can't eat just one


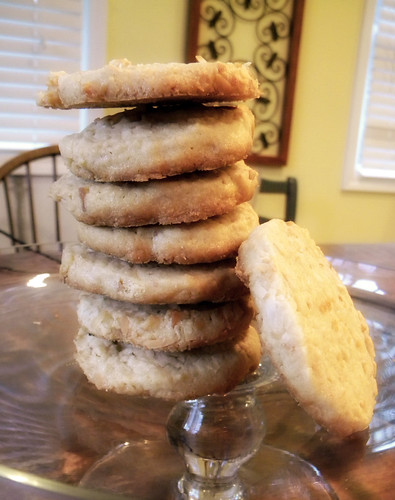
Coconut Cookies
It's nice to be able to get away every once in a while, and when you're on a strict budget, it's nice to know that you can "get away" just by visiting a friend. Visiting J&J's house is like going to a B&B. It's right on the water on a quiet street, the couches are comfy, and the food is fabulous! They are both foodies and it's a pleasure to just sit with a cup of tea, play a game or two and chat. I went up there a few weeks ago and on the table was a freshly baked batch of these addictive coconut cookies. We must have polished off at least half of the batch before we even realized what happened, they were that good, so I thought I'd share the recipe with you too. They go great with a cup of tea and a nice conversation.

Toasted Coconut Icebox Cookies
The recipe was adapted from an orange coconut version by Aida Mollenkamp, and if you like, you can add some orange zest to the mix, but my friend left it out and I liked it just that way.

* 2 cups all-purpose flour
* 1/2 teaspoon table salt
* 1 cup unsalted butter, at room temperature
* 1/2 cup sugar, plus extra for rolling cookies
* 1/4 cup packed light brown sugar
* 1 large egg, at room temperature
* 1 teaspoon vanilla extract
* 1 cup toasted sweetened coconut

1. Heat oven to 350 degrees F and arrange a rack in the middle.
2. Combine the flour and salt in a large bowl and whisk until evenly combined.
3. Using a stand mixer fitted with a paddle attachment beat together butter and sugars over high speed until light and airy, about 2 minutes. Add the egg and vanilla and mix until just combined.
4. Reduce the speed to medium and add the flour mixture and coconut and beat until just evenly combined. Lay 2 large pieces of plastic wrap on a clean work surface and put half of the dough along the center of each piece. Shape the dough into 2 logs measuring about 1 1/2-inches in diameter and 10-inches long. Roll logs up in the plastic and secure tightly. Refrigerate the logs for 1 hour or up to several weeks.
5. Cut the logs into 1/2-inch slices. Roll the cookies in sugar to coat and shake off excess. Arrange on a baking sheet, leaving 1/2-inch between the cookies. Bake until set and golden on the edges, about 15 to 18 minutes. Remove to cooling racks to cool completely.

Enjoy!

How about a little game of Poker?


Poker Cakes
Any game, poker included, can be much improved by the addition of cake. Toss in a few birthdays and it sounds like an all out party. A coworker from my last job emailed me a few weeks ago asking if I'd be interested in making a couple of cakes with a poker theme for her husband's and his niece's husband's birthdays. And she was pretty open about the flavors she wanted, so after going back and forth for a bit, we decided on a rich chocolate cake, my no-carrot carrot cake, and a white chocolate dulce de leche cake. I decided not to experiment with any new recipes this time around and go with the old standby's so that I would be absolutely sure everything would come out great. I found some poker chip designs online and copied them for two of the cakes:

Poker Chip Cake
And the chocolate cake lent itself quite nicely to being turned into a poker table:

Poker Table Cake
And since the cakes were for 2 birthdays, I put two jokers on the table :D

Monday, November 16, 2009

The Biggest Cake Ever

I find myself making a lot of extreme statements lately. The best focaccia, the best hot chocolate, the greatest cookie icing ever, and while it might sound like slight exaggerations, this one certainly is not. This cake was meant to feed 175 people and it could have easily taken care of over 250, especially if you consider the tiny slices the caterers chopped this monstrosity into. It was a yummy lemon cake with a buttercream heavily spiked with fresh lemon curd and it was the wedding cake I made for my coworker's big day. For once I planned ahead, I went to Home Depot and had them cut down a block of wood to use as a base and I wrapped it with a pillow case (a quick pat on the back for resourcefulness), lined with saran wrap layered the freshly baked cakes and spread with the frosting I made the day before (I still have a day job you know), and decorated with white chocolate leaves I made while the cakes were baking. And then I went to pick it up. I tried, I really did, and I promise you, I'm no weakling, but I could not pick this thing up to save my life, let alone carry it down several flights of stairs to my car. I made this realization maybe an hour before I had to leave the house, with cake in tow, and carefully make my way to the land time forgot where the wedding was to be held.

Fran's Wedding Cake

I had to call for help. Luckily I have a friend that lives near by and after she stopped laughing at me, she grabbed her brother and rushed over to help load the beast into my trunk. I'll skip the story about how I got lost on the way there and saw the "Welcome to Indiana" sign 6 times before I finally found my exit, and just tell you that the cake was very well received...even if no one but the bride, the groom and the photographer saw it. You see, they ran to the cake right away for pictures and then the caterers whisked it into the kitchen to be cut. I was a little sad at first, but then I decided that as long as the cake was good and the bride was happy, I'm happy.

Easy Lemon Curd Recipe

1 tablespoon plus 2 teaspoons finely grated fresh lemon zest
1 cup fresh lemon juice
1 1/3 cups sugar
4 large eggs
1 3/4 sticks unsalted butter, cut into tablespoon pieces

Whisk together zest, lemon juice, sugar, eggs, and a pinch of salt in a 2-quart heavy saucepan. Add butter all at once and cook over moderately low heat, whisking constantly, until curd is thick enough to hold marks of whisk and first bubbles appear on surface, about 10 minutes. Immediately pour curd through a fine sieve into a bowl. Press plastic wrap directly onto surface of curd and chill until cold.

It should be made the day before you want to use it so it has enough time to set, and you can either slather it directly onto cakes, muffins, and toast, or whip it into your favorite buttercream recipe as I've done for the wedding cake. Be sure to lick the spoon, this stuff is great!

Wednesday, November 11, 2009

The Best Hot Chocolate, and just in time


XOCO Chocolate
As the weather cools and the last of the golden leaves fall to the ground, your thoughts should turn to the one great winter time diversion....hot chocolate! And if you find yourself in Chicago, wondering around in the bitter cold, with your frozen hands tucked deep in your pockets, searching for a small reprieve, consider stopping by XOCO. I'm trying not to sound too much like a commercial, but this recently opened restaurant from Rick Bayless to which my friend introduced me a few weeks ago serves the best hot chocolate I've ever had and I just can't not share this find with you guys. I'm sure their food is good too, but both times I've been there I've been drawn by the freshly home ground chocolate fairies, besides, a cup of the stuff is basically a meal on it's own. So go...and when you do, take me with you :D

Best Hot Chocolate EVER

Thursday, November 5, 2009

We be jammin'

No matter how much I try, I am a baker not a cook. I've always envied those that can step into the kitchen without a plan, swing open the fridge and produce the perfect, or at the very least edible, three course dinner. I end up swinging open the fridge door....and then making mac-n-cheese. With water, because I'm usually out of milk. Or ramen with whatever vegetable or herb is lying around hiding behind a row of colorful jars full of frosting leftovers. Whenever I have company coming, I always get very anxious and I research different dinner menus for days on end, make extensive shopping lists of things the cashiers can't pronounce, let alone know how to ring up, and run around like a chicken with it's head cut off (shoot, I forgot to buy the chicken!) trying to make sure that everything comes out just as the recipes, and numerous reviewers, promised. I don't know how, but my mother, who has entertained on many various occasions over the last few decades, always manages to put out a table groaning under all the assorted dishes with seemingly no effort at all. And should you ask her for a recipe, oh my, you better have a bit of patience. She speaks in ingredients, not quantities. The recipe for a herring spread, for example, will start with "send your father to the store" because no one else knows exactly what to get, how much to pay or how many to get and you're just doomed right away should you go without him. The rest of the recipe will go downhill for me because everything will depend on just how many herring he bought, how big they were, how low the tide was that month and how many chipmunks ran across the back yard driving our cat crazy in the last 14 minutes. These conversations inevitably send me running to google as I frantically enter the ingredients into the search box to see if anyone else has tried making this concoction.

Ripped up plums
This is exactly what happened when I asked for my mom's awesome plum jam recipe. Everyone loves when she makes it and my dad's only complaint about it is that it gets a bit runny making it hard to quickly fish out of the jar with a fork without getting caught (she keeps the fruit chunks big for him to think he's getting away with it). I came across a small mountain of perfectly ripe Italian plums at the store and since I've been on a small jamming frenzy lately, I called her to ask how she makes her jam.

Mom: "You'll need a lot of plums and some sugar and then just cook everything down"
Me: "But how much sugar do you add? How many cups of plums? How long do you cook it?"
Mom: "I don't know...how ever much you want and until it's done. Why are you making it anyways? I gave you a jar just the other day."
Me: "Sigh" and off to the internet

I was surprised to learn that there are not that many recipes out there for this jam, which is shocking because it's AWESOME! It goes great on pancakes, toast, inside crepes, with tea and a spoon, on waffles and I'm told it's even good with pork. I did find some reasonable recipes, but they seemed to add gimmicks, like cinnamon or Grand Marnier, which is nice, but all I wanted was straight up Plum Jam. Other recipes included a pound for pound ratio of plums to sugar...and that's just crazy, or at least way to sweet for my taste. I'll try not to judge. So I decided to combine a bit of what I've learned from the other jam recipes that I tried and just whip something up.

Since I wanted to repeat this experiment if it went well, I measured everything and the ratio that I came up with is 1 cup of sugar per pound of pitted fruit and a tablespoon of freshly juiced lemon. I like recipes that are easy to remember :D These are the amounts I ended up using and in the end I had about ten 8oz jars of yummy jam:

6 pounds of washed and pitted plums
6 scant cups of sugar
juice from 2 lemons

- The lemons are high in pectin and would make sure that the mixture jelled well even if I didn't want to thicken it with sugar. I ripped the plums into shreds using my fingers while I was pitting them. Why get a knife and a cutting board dirty? It's faster and more satisfying to do it by hand anyways. I then mixed all the ingredients and let the mixture stand for 30 min in the fridge. I mean, hey, it did wonders for the strawberry jam back in July, so it can't hurt here either, right?
- Then I dumped everything into a huge pot, making sure there's plenty of room because the mixture will rise and bubble and you wouldn't want all your work to run away from you, turned the heat to medium and cooked for about 20 minutes until the fruit was very soft.
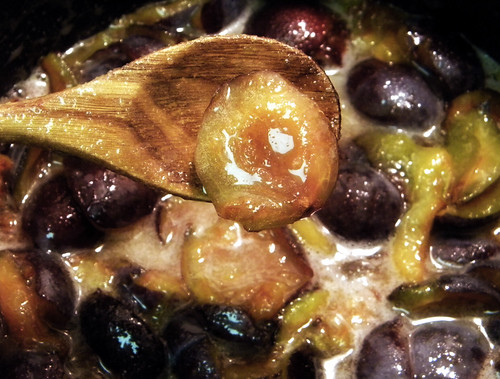
Cooking Plums
- I took it off the heat and used my immersion blender to smooth out the mixture into a rough pulp. You don't have to do this, but I wanted a more spreadable jam.
- I popped a plate into the freezer (this will make sense later) and put the pot back over medium heat, stirring constantly. Once it looked like it was getting to the right consistency (about 15 more minutes) I took the plate out of the freezer and dropped a few drops of the jam on it. Let the drop sit there for a bit and then nudge it with your finger. If it wrinkles, even a little, the jam is done. If it just runs away from your finger, it needs to be cooked a bit longer, so put the plate back into the freezer and test again in 5 minutes. You may want to skim the jam if it gets too foamy, but I got lazy and just kept stirring.

Foamy Jam
- Fill several clean jars within a half inch from the top with the jam and screw on clean, pre-boiled for 5 minutes, lids.
- Put your jars into a large canning pot and fill with water so that the water covers the jars by an inch. Put over high heat and once the water starts to boil, set the timer to 15 minutes. When the timer goes off, turn off the heat, fish out the jars with tongs and let them cool completely on a kitchen towel. I like to flip them upside down while they're cooling. This may not do anything, but I'm convinced it gives the jars a better seal. The tops should all pull in and not budge when you press them with your finger. If one of your jars doesn't seal properly, feel free to give it another hot bath, but I haven't run into this scenario yet, so I'm sure you have nothing to worry about.
- Make pretty labels, wrap in pretty paper, hide in the pantry or share with a friend, the jam should keep for a year...that is if it survives that long without getting eaten :D

I'm still having camera problems and it was too late at night to make the jars all pretty, so you'll just have to take my word for it when I say the jam came out a perfect dark purple and looked and tasted just like my mom's, that is to say, yummy!

Monday, November 2, 2009

Yummy Sweet Potato Pie

I hate pumpkin pie. I know this is the season for it and making a statement like that is probably heresy, but I keep giving it a chance and each time....bleh. I guess it's just not my thing, but I always felt like I was missing out on a tradition. My coworker told me about a variation about a year or two ago in a long winded tale of how he can't find one anywhere and how he'd PAY to have it right NOW. Huh. An opportunity to learn a new recipe, make someone happy, and possibly recoup the cost of the ingredients...how could I pass it up? The pie he wove tales of was a sweet potato pie, with a graham cracker crust and a pecan topping. Doesn't that just sound yummy? I thought it did, so I gave it a try and the pie came out great. I also learned that while it looks just like pumpkin pie, it doesn't taste like it, not really, and I love this variation. Also, if I remember the story correctly, I think my coworker took his pie to a poker game and made money by selling it to his hungry friends by the slice towards the end of the game when snacks ran out. This was over a year ago and recently he's been hinting that life would be a heck of a lot better if that pie found it's way back into his life and when I found myself in front of a pile of sweet potatoes at the grocery store, I thought of him and caved.

Sweet Potato Pie with Pecan Topping
You can make the crust yourself with some crushed graham crackers and melted butter, but usually I cheat and just buy one. It's the one time I don't think homemade makes that much of a difference.

* 2 medium or 3 small sweet potatoes
* 1/2 stick unsalted butter
* 3/4 cup sugar
* 3/4 cup whole milk (at room temp)
* 3 large eggs
* 1 teaspoon vanilla
* 1/2 tsp cinnamon
* 1/4 tsp freshly grated nutmeg
* 1/4 tsp salt
* 1 Tbsp dark rum
* 1 Tbsp all-purpose flour
* 1 deep graham cracker crust

Preheat the oven to 400°F and set the oven rack to the middle of the oven.

You could bake the sweet potatoes in the oven if you like, but I find that it takes too long and your microwave can do the job in a fraction of the time, so...stab the sweet potatoes with a fork all over (very therapeutic), place in a microwave safe bowl, cover loosely with a paper towel to avoid cleanup later, and nuke for about 10 minutes, turning them over around the 7 minute mark so they cook evenly. Poke them a few times with a fork to make sure they're done and pop back in for two more minutes if you hit a firm spot. Cool until you can handle them, peel and mash in a large bowl until smooth. I'm impatient and I usually pretend I've got asbestos hands so I don't wait to peel them and then I end up doing a little dance where I peel a piece off and then hop about blowing on my singed fingers for a second before doing it all over again. Don't be like me. Wait.

Melt the butter in a small saucepan and stir in the sugar. Add the melted butter mixture to the sweet potatoes with the milk and the eggs and beat with a whisk until smooth. Whisk in the remaining ingredients (the filling will be pretty liquid) and pour the filling into the pie shell.

I like to put the pie dish on a baking sheet, especially if you're using a store bought crust in one of those flimsy foil pans. It makes moving the thing around once it's hot so much easier. Carefully transfer the pie in the baking sheet to the oven and bake until the filling is almost set, about 35-40 minutes. When there's 5 minutes left, make the topping:

* 1/2 stick unsalted butter
* 1/4 cup firmly packed dark brown sugar
* 2 tablespoons honey
* 1 cup pecans

Stir first 3 ingredients in heavy medium saucepan over low heat until sugar dissolves. Increase heat and boil 1 minute. Mix in nuts, coating completely.

Carefully take the pie out of the oven (aren't you glad you used the sheet pan now?) and spoon the hot nut mixture all over pie, distributing the nuts evenly over the top. Put the pie back in the oven and continue baking until topping bubbles, about 5 minutes. Transfer to rack and cool completely.

If you doubled the recipe and made two, you can share with a friend, if you really really want :D

Saturday, October 31, 2009

Happy Halloween!

After listening to my stream of complaints about my ancient computer that's refusing to get with the times and recognize any USB devices including my camera, a very wise (or very annoyed) friend recommended I just go to Walgreens and make a CD for just a few bucks. Huh. Now why didn't I think of that? Genius! I'm not completely in love with the kiosks that are available at the store, and neither was the poor woman trying for almost an hour to scan her pictures and get a CD made that was ahead of me in line, but once I got everything loaded up I was able to walk away with two CDs full of over 1000 pictures for about three bucks. Can't beat that. So why am I telling you all this? Because all the past few weeks that this blog has been sitting idle, I have been baking, cooking, and generally coming up with evil schemes while angrily staring at my stubborn computer, and now I'll be able to share with you some of what I've been up to starting with these Halloween Cookie Pops!

A good friend's little girl is turning one tomorrow and in honor of the occasion my friend is throwing a HUGE party for all family and friends within a reasonable driving distance. She's making a ton of decorations and food and asked me to make 75 cookie pops to include in the party favors. Since the birthday is the day after Halloween, she wanted a fall theme and pumpkins sounded perfect. Besides, everything is just THAT much more fun to eat when it's on a stick, don't you think?

Pumpkin Cookie Pops
I've made sugar cookies before, I have a great recipe and I make them every year around Christmas to include in the cookie boxes I give out, but because I always go a bit crazy, I never have time to really decorate them, so aside from a small attempt at Valentine's I've never actually made iced cookies before. Determined to make the very best icing that would not only look good, but also taste good, I again went hunting on the net and I found a great post for cookie pops on this fabulous blog: Our Best Bites. Her story about finding the perfect recipe echoed my own goal so closely that I decided to give her sugar cookie recipe a try along with the icing. And let me tell you, they came out great. I was a little nervous when I tried one straight from the oven as it was a bit dry, but they blossomed overnight and when I tried another cookie the next morning while testing the dryness of the icing, the cookie was tender and deliciously buttery. Success! Plus the addition of a bit of lemon extract to the icing gave it a nice hint of flavor that transformed the simple sugar cookie into something really special.

I ended up making over a hundred of these and after packaging up the prettiest ones for my friend I took all the rest to work as Halloween treats, where they were devoured with only one small fist fight over the last cookie, so I would HIGHLY recommend you find some time, head over to Our Best Bites for the recipes, make a batch or two of these cookies, decorate however you like, and share with a friend over a cup of tea. Tea optional.

Oh, before I go, in the spirit of Halloween, and since I can't exactly hand out candy to all of you through this site, I'll give you something else that I found recently, yet another awesome blog! Yes, it seems I've become an international serial blog stalker and no blog is safe from my prying eyes! Bwahahaha! Ahem. Anyhoo....where was I? Oh yes! The awesome blog! This lovely lady has taken recipe sharing to the next level by adding witty stories and colorful illustrations, and you better believe I'm putting her book on my Holiday Wish List. Click on the illustration to go to her site and join me in my unbridled adoration:

BST-vampire

Enjoy and Happy Halloween!!!

Monday, October 5, 2009

Peachy Keen


Can I just start by saying that despite many years of faithful service, I have come to hate my computer? It's kind of like living with a temperamental toddler who will play nice one day and throw a tantrum and refuse to acknowledge the outside world the next. Right now he's in a "mood". He's determined that he is the center of my world and that none of the other so-called "devices" exist or deserve his attention. In short, he's refusing to recognize almost any of my USB devices, including my printer and my camera. I even tried to trick him by trying to upload pictures using a little memory card converter I had lying around, but no dice. So while I have a ton of pictures building up, I can't get any of them onto this computer to share with you. You know what this means? Time to start saving up for a sleek, sexy, and completely complaisant new laptop! That'll show this old clunker!

Whatta Peach
Speaking of sexy...and please forgive me if this gets a tiny bit risque, but doesn't this look like a tushie to you? It's completely possible that I've been staring way too long at this food porn site, but then I dare you to go there and not get lost for at least an hour. I double dog dare you.

Downward Dog
I realize that I might be just a smidge juvenile here, but when I was looking at this picture, I had to giggle and when I had to give it a title I had bright neon flashy signs in my head saying "downward dog". As in the yoga position? anyone? okay, it's just me then.

This was one of 9 perfectly over-pampered peaches that were delivered to my office from Harry and David, and while they were probably the most expensive peaches I will never buy, I will accept a gift of them any day. It was perfectly juicy and sweet, and it was obvious that it was never exposed to a stern word, let alone the cruel cruel world, before it was lovingly dressed in the gauzy tissue and cradled into that cushy box. It never even guessed that it was on it's way to it's demise at the hands of strangers. Such a bittersweet story...slurp...excuse me, I have to go wash my hands and get rid of the evidence.

Wednesday, September 23, 2009

Monkeying Around


Chocolate Banana Birthday Cake
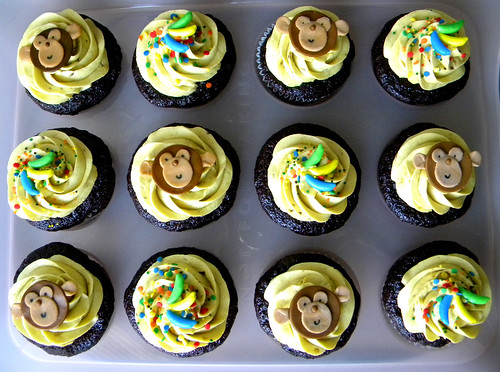
I had an order this past weekend for a little boy's 1st birthday with a monkey theme. I love Curious George and I loved the color scheme that they had (yellow/brown/blue), so these were very fun to make. They wanted a bunch of cupcakes and a little "smush" cake for the birthday boy and the flavors would of course be chocolate/banana.

Chocolate Monkeys
I happened to be shopping at TJMaxx a few days previous and I found several adorable milk bottles filled with colorful candy bananas which, along with some sprinkles, worked perfectly for half the cupcakes.

Banana Monkeys
I was also browsing the web looking for inspiration for monkey decorations when I stumbled upon this fabulous blog that not only has the cutest designs ever, but it has the most fool-proof step-by-step instructions on how to make all sorts of different toppers: The Frosted Cake 'n Cookie. While I didn't have any fondant lying around, I figured sugar paste would work just as well.


Half the cupcakes were banana with a chocolate buttercream and the other half were chocolate banana with a banana buttercream. I think I'm going to work more on the banana cake before I share the recipe, but the chocolate banana recipe I found at Joy of Baking was absolutely perfect! The cake was a combination of both, so a layer of banana, a layer of chocolate with banana buttercream inside and vanilla buttercream on the outside since I wanted the pale baby colors to show.


I didn't bring my camera when I delivered the goodies, which is too bad because my friend fromTruly Smitten was doing the decorations and everything looked gorgeous! Look at these cute cupcake toppers she created:


And she was nice enough to send me these pictures to share with you, including a picture of the one she saved for herself and took home for later :D

Monday, September 21, 2009

La Belle Paris


Eiffel Tower
Whew, it's been a busy month. I've had several cake orders, crazy busy work days and a furiously hectic week in Paris, but I'm determined to get more then one post a month up, so I promise to try and be better.

Notre Dame Gargoyle
What can I say, Paris was everything I remember and a thousand times more. The last time I was there was over 10 years ago on a student exchange program and I barely got to see anything outside of the old medieval looking school in Lyon. During our short trip to Paris I remember kidnapping our teacher with a handful of other students to see the Louvre, while the rest of the group stood in line for Madam Tussuad's Wax Museum. But this time I was going to do things differently. This time I was taking my sister and this time I was going to let her go nuts, which basically means that in the traditional spirit of our family vacationing style, we were going to see absolutely everything. Time restrictions and physical abilities be damned. We walked up and down the city a dozen times over, faithfully following Rick Steves' Paris 2010, in a frenzied pinball machine fashion stopping only to eat and even then reluctant to stay still afraid we'd miss something. We climbed Notre Dame and saw the city through the eyes of the famous gargoyles. We went to the top of the Eiffel Tower (after a picnic on the lawn up front with a baguette, a bottle of wine and an impromptu visit from Ratatouille's cousin).

Invalides
We walked up Champs Elysee past le Grande Palais, le Pettit Palais, Les Invalides, to Arc de Triumphe and climbed to the top of that too.

Arc de Triumphe
We walked up through Montmartre, visiting the homes and hangouts of all the famous painters, and back down to the still famous Moulin Rouge.

Moulin Rouge
We walked through the food markets, drooled at the windows of every pastry shop, patisserie, boulangerie, charcuterie, and every other kind of "erie" you can imagine.

And I've come away with a few questions, like why can't we have fresh Crepe stands in Chicago?

Fresh Crepes
I mean look at this Grand Marnier one right here, it was the absolute perfect thing to eat while sitting at a small table resting and people watching.

Grand Marnier Crepe

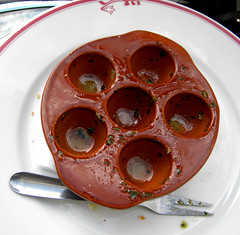
I think the world would be much better with more of these. Next thought: escargot can be absolutely divine if prepared properly:

EscargotEscargot gone
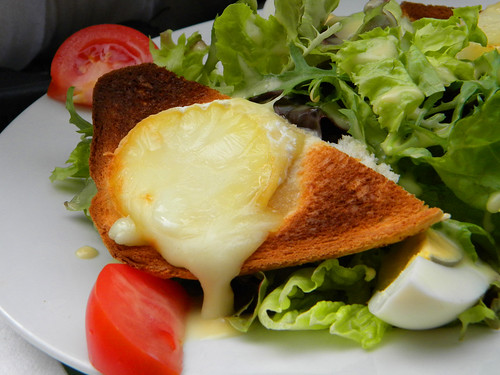
And I'd eat a lot more salads if they were accompanied by a warm slice of melty honeyed goat cheese:

Honey Goat Cheese Salad

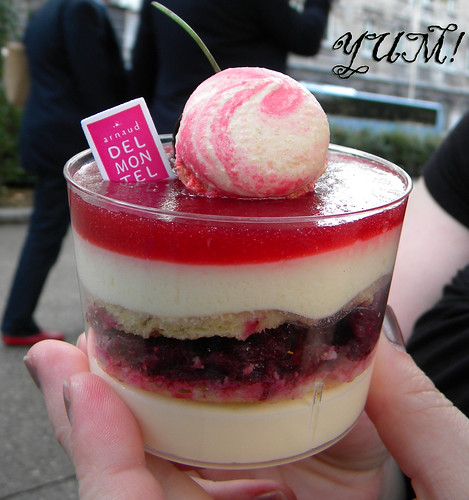
And finally, American bakers need to spend more time taking french pastry courses. Have you ever even heard of a Cherry Tiramisu? I am definitely going to try and recreate this little beauty:

Cherry Tiramisu
If you want to see more pictures, I'm still going through them and uploading them, but you can find the rest of them here, and you can expect many more macarons from me in the future :)

Tuesday, August 18, 2009

Out of the Box Fun


Cake Pops
Normally I'm against box cakes. I prefer to pour over the recipe books, pick out the best one, hunt for the best ingredients, carefully measure everything and marvel as all the separate pieces are transformed into something fragrant and beautiful. But this time I decided to just have some fun. I've been ogling Bakerella's ingenious Cake Pops for a long time now, promising myself that one day I'll give them a try. Last Friday was that day, since that's what I decided to bring to my friend's baby shower. I rushed over to a friends house having filled a large box with all the supplies and got right to work. It took less than 5 minutes to whip up a batch of Duncan Hines chocolate cake batter, pop it in the oven, set the timer and settle on the couch to catch up with my friend. Once the cake was done and cool, it was actually somewhat therapeutic to sit with a bowl on my lap and reduce what my friend lamented was a perfectly good cake into crumbs. You can go here for the full instructions, but here are a few things I learned while making these:

1. Don't add the whole can of frosting to the crumbs. Add 3/4ths and see if it's enough first or your mixture will be too soft.
2. Don't make the balls too big. Walnut size or a bit smaller is perfect.
3. Make sure you have the right size cookie cutter all set and ready to go...otherwise you'll end up shaping them by hand and they'll look more like mushrooms then cupcakes.
4. Use candy coating if you want them to look like Bakerella's. I'm against it on principle, so I used semi-sweet chocolate for the bottoms and colored white chocolate for the tops, but they were both too thick to make a nice smooth thin coating, so my pops don't look like hers. For my first try, I decided I was okay with that.
5. If you get tired of dipping before all the balls are coated...you can just wrap them up and pop them in the freezer...they make great snacks for later :D

They were a hit at the shower and I hope you do try making them, especially if you have kids around. You can let them decorate these however they want and since it's straight out of a box, you'll get to the fun decorating part pretty quickly. Next time, I'm going to try the Hello Kitty ones. Aren't they adorable?

Cake Pop Closeup

Friday, August 14, 2009

The Best Focaccia Ever


FocacciaSandwich
I love Roasted red peppers. I love everything about them. I love how they look under the broiler, all bright red and glossy from the thin coat of olive oil. I love when the thin skin peels right off in one or two large pieces, even if it doesn't often happen that way. I love how it tastes and I love how it looks tossed with a pile of caramelized onions in a jar, or even better on toast. It's the easiest thing in the world to make and it never fails to impress, which leads me to my recipe for the best focaccia bread recipe ever from what is becoming one of my favorite cookbooks, Apples for Jam, topped with soft goat cheese and roasted peppers:

Olive Oil Focaccia with Goat Cheese and Roasted Red Peppers
adapted from Apples for Jam:

1 3/4 cups warm water
1/4 oz active dry yeast
1 tsp honey
2 tbsp olive oil
600 grams flour
1 tbsp Italian seasoning
1 tsp garlic powder
1 1/2 tsp salt

4 red peppers
1 large onion
a bit of olive oil


- Put water, yeast, honey, 1 tbsp oil and about a cup of the flour into a bowl and mix until smooth. Cover with a towel and leave in a warm spot for 20-30 minutes until it all froths up and looks foamy.
- Mix in the rest of the flour, the Italian seasoning, garlic powder and the salt and using a dough hook, mix for 4-5 minutes until it's well incorporated. I have a stand mixer, but if you don't she recommends you just mix it with your hands by slapping it around the bowl for a while. Cover the bowl with a towel again and let it rise in a warm spot for about an hour and a half. It should puff up a great deal.
- Lightly oil a rectangular baking dish (11x16). Punch down the dough lightly and carefully spread it in the dish, gently stretching it to the edges making sure it's mostly even. If it won't stretch, leave it for a few minutes and come back to try again, but don't rip it. Tent it with a towel (put some glasses around the dish and drape the towel over them) and let it rise again for about 45 minutes.
- Wash and dry the red peppers and rub completely with a bit of olive oil. Place on a baking sheet and broil them until their skin is nicely charred, checking and turning them every few minutes to make sure it's even.
- Turn down the oven to 450F when you're done, put the peppers into a bowl and tightly cover with saran wrap to let them steam and cool a bit for about 15 minutes.
- Slice the onion into thin ribbons and cook with a bit of olive oil on medium in a large skillet, stirring frequently until they're soft and a nice caramel color. Set aside.
- Mix the remaining 1 tbsp of oil with about a half cup of hot water and a teaspoon of salt. Stir until the salt dissolves.
- Make some dimples in the dough with your fingers and brush well with the water mixture. Put in the oven and bake for about 20-30 minutes until the bread is golden on top.
- While the bread is baking, uncover the peppers and carefully peel as much of the skin as you can. Take out and discard the stem, the seeds and some of the inner membrane and slice the peppers into ribbons. Add to the onions and toss together.
- Let bread cool a bit and then pop out of the pan and cut into pieces. Spread some goat cheese on each slice and top with the pepper mixture. Enjoy!

Thursday, August 13, 2009

Surprise Tea Party


SugarBowl

I am notorious for ruining surprises and, as is usual with ungrateful children, I blame the parents. My dad will buy a birthday present a month in advance and he'd be bursting to give it to you the moment he gets home. He doesn't want to wait even one extra minute to see the look of joy on your face and I tend to be the same way. I try to trick myself into keeping the present a secret by hiding it from myself, which is how I end up with a closet full of forgotten presents that get delivered years later and not always to the people I bought them for. And if someone else dares to plan a surprise for me, I manage to find ways to undermine that too. One year my friends came to pick me up for a surprise birthday outing where they were going to treat me to a pedicure and manicure (that was supposed to be the surprise), only to be greeted at the door by a very excited me, showing off the freshly manicured fingers and toes that I had gone out and had done that very morning.

BerryBowl

Despite this family history, we keep trying to make a surprise work. We keep planning surprise anniversary nights on the town, hiding that perfect present for a birthday months away, and organizing a party that for once will definitely be a complete surprise. I'm happy to announce that two of us finally succeeded! My little sister and I have set out to throw a surprise baby shower for my older sister who's expecting my second nephew, and on a one week notice no less! My job was to cook and host while my little sister's task was to keep the surprisee out on the town all morning and casually drop by to "pick me up for lunch". Considering that she's a terrible liar, she did a wonderful job because when they walked in and my sister saw a house full of her friends she was speechless (and she's almost never speechless). Is this the beginning of flawlessly executed surprises going forward? Probably not, but it felt great to succeed for once.

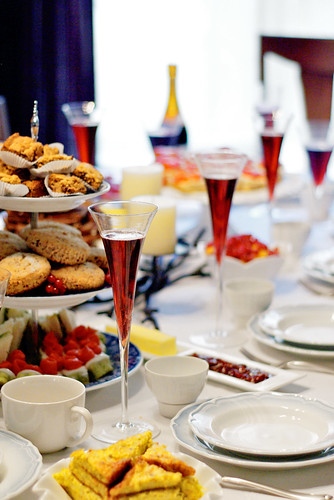
TableScape

As usual, I got a bit carried away with the menu, and I'm going to include as many recipes as I can type out before my fingers go numb, but I wanted to take a minute to thank Olga for these lovely pictures (I was too busy tending the table, passing around plates of food and keeping the glasses full of the Blood Orange Sparkling Juice to remember my camera until it was too late). Thank you for letting me use them here :)

CucumberPestoSandwiches

First up we have the lovely Pesto Cucumber Sandwiches:

Pesto:
This recipe will be a bit on the hazy side because I just tossed it together from memory. I crammed several very generous bunches of basil (let's say 3 cups?) into the food processor, added several handfuls of pine nuts (about half a cup?) and whirred it into a paste. I added a healthy stream of olive oil (let's say 1/3 of a cup), some salt and pepper, several cloves of mushed up garlic and whirred it again until the paste was uniform once again. Finally I added lots of freshly shredded Parmesan cheese (1/2 a cup?) and whirred the machine once again until I was happy. I'm sorry for the fuzzy measurements, but I assure you, as long as your ingredients are fresh, the results will be lovely even if you're a few teaspoons off on any one thing and you can always add more "stuff" if it doesn't look right to you.

Sandwiches:
Once you have your pesto, just slather it onto a slice of white bread and cover with thin slices of cucumber. Spread some softened cream cheese on another slice of bread and sandwich the two together. Cut off the edges (they can be tossed or one of your guests can nibble on them behind your back) and cut on the diagonal into two triangles. Repeat for as many sandwiches as you want or as long as the pesto/bread/cucumbers last.


Next up were the popular Zuccini Triangles, the recipe for which I've had for years and I think came from Betty Crocker. They're in the lower right-hand corner of the picture of the table above.

3 cups shredded zucchini (3-4 depending on size)
1 cup Bisquick mix
1/2 cup finely chopped onion
1/2 cup grated Parmesan cheese
2 tablespoons chopped fresh parsley
1/2 teaspoon salt
1/2 teaspoon seasoned salt
1/2 teaspoon Italian seasoning
1/8 teaspoon pepper
1 garlic clove, finely chopped
1/2 cup vegetable oil
4 eggs, slightly beaten

- Heat oven to 350ºF. Line a rectangular pan with foil and brush with olive oil.
- Stir together all ingredients in a great big bowl and spread in pan.
- Bake about 30 minutes or until golden brown.
- Let the pan cool a bit, lift out the foil onto a cutting surface and cut into squares, triangles, or whatever shape you like.
Note: if you make these in advance, they don't mind a quick turn in the microwave one bit.

Yikes! I've let the time get away from me once again and now I must go to sleep, but stay tuned and I'll post the rest of the recipes in the next day or so.

P.S. Don't you just love the heart shaped sugar cubes up above? They make a cup of tea just that much sweeter :)