Tuesday, March 29, 2011

Hazelnut and Peach Jam Financier and a Review

Greetings from Slackerville!
I've never understood the point of a stay-cation. Isn't a major change of scenery and the ability to forget you even own a cell phone a major aspect of a proper getaway? A proper vacation is not in the cards for me this year though, so I'm replacing it by random road trips and spontaneous bursts of doing nothing. Or at least nothing useful, I've still not mastered the fine art of couch potato zen. And so it is these very pursuits that have kept me from contributing anything of value (and therefore anything period) to this blog. I have however been baking, and quite a bit (though not all of it picture worthy, let alone blog worthy), so pull up a chair and take a look.

A few weeks ago the lovely folks over at Oh!Nuts have contacted me about trying out their products, which was sort of awesome since I've ordered from them before and absolutely loved everything about this little company. They have a pretty good selection of nuts and dried fruit, but what's even better, they have a pretty good selection of nut flours at a very reasonable price. I've tried grinding my own, but despite completely ruining one coffee grinder and almost melting my Magic Bullet, I have never been able to get it as fine as I'd like. Since I got to pick what to try, I asked for a bag of hazelnut flour and pistachios (because I'll never ever ever ever pass on pistachios that I don't have to shell). I had visions of Nutellaesque marcarons, but when the bag was sitting on my counter I suddenly got a craving for something simple. Something humble looking, but with complex flavors. Something that doesn't need frosting. Something that would help me put a dent, even a small one, in my still rather plentiful stash of jam. Which is where the lovely Cannelle et Vanille came in.

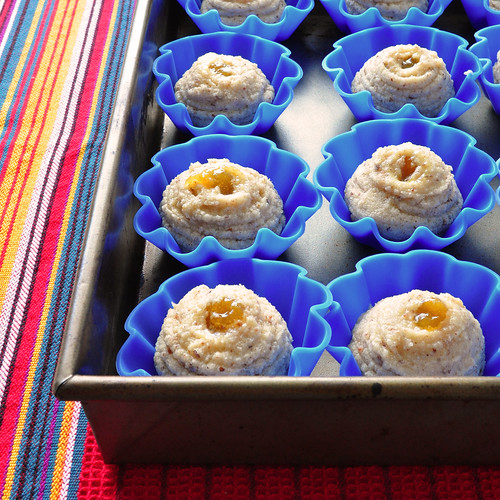
I've been bookmarking recipes on her blog for, oh gosh, probably 3 years now? Somehow her gorgeous photography has made me afraid of trying the recipes. There's no way anything I made would look that perfect. But this weekend I decided that I don't care. If they turned out ugly, they'd still get eaten, so I rolled up my sleeves and got to work. I tweaked the recipe a bit, burned one batch of browned butter (I'm serious when I say don't walk away from it!), browned a perfect batch of butter (that lovely smell stays in the kitchen for days), added my vanilla bourbon and peach jam, tossed the batter in the fridge and went to sleep. The next day, after less then 5 minutes of work, I had these lovelies:
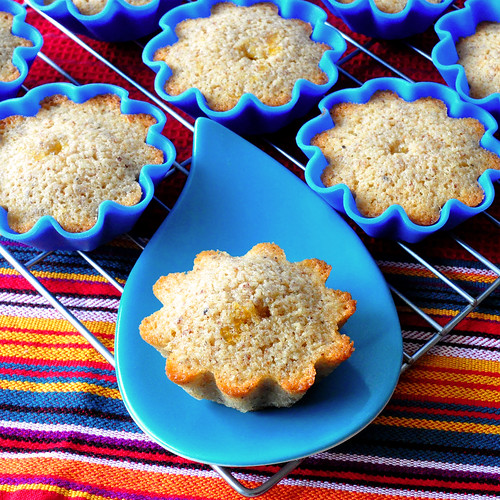
Financier Baked

Uh....yum.

Hazelnut and Peach Jam Financier
Recipe adapted from Cannelle et Vanille

120 grams egg whites (this ended up being about 3 medium egg whites for me)
125 grams sugar
55 grams flour
55 grams hazelnut meal
150 grams unsalted butter, browned and strained, cooled

Cook the butter in a small saucepan until it starts to foam and dark particles start to form on the bottom of the pan. Don't leave it for a second, and stir it the whole time to make sure it cooks evenly*. It will smell nutty and turn a light caramel color. Take it off the heat right away to prevent burning, strain the butter and let it cool.

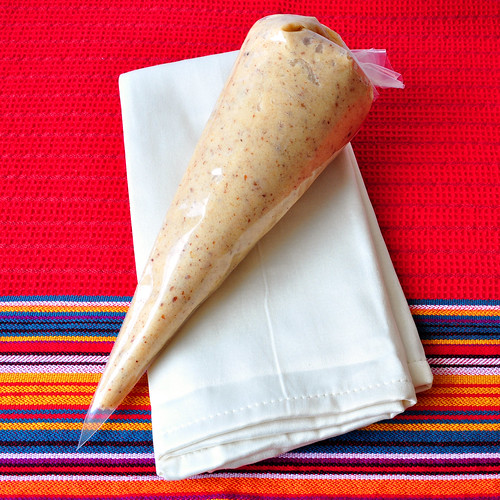
Whisk the first four ingredients together in a bowl. Slowly add the brown butter and whisk until it is incorporated. Stuff the batter into a pastry bag or a ziplock bag, and let it rest in the refrigerator overnight.

Financier Dough

The next day, preheat the oven to 375F.
Pipe batter into silicon mold or a mini muffin tin. Using a small round tip, pipe a small amount of jam into the middle of each batter mound.

Financier Raw

Bake for about 10-20 minutes or until golden. Time will vary depending on the size of the mold. I think mine were on the bigger side and took a full 20 minutes to cook, but you should keep an eye on yours.

* If you do burn the butter, as long as it's not completely black, I'm told that you can strain it, whisk some lemon juice into it while it's still hot, and still use it as a lovely sauce on fish. Mine is in the fridge, so I'll let you know how that comes out.

Financier Baked 2

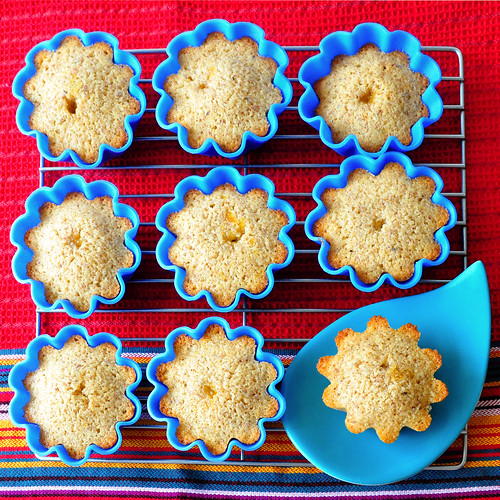
They're great warm, but if you wait until they're cool, the top will caramelize into a very light crumbly crispy sugary crust that will make you swoon.


Disclosure: I was sent the hazelnut flour used in this recipe at no charge by Oh!Nuts, however I truly loved the product and gave as unbiased review as I could while wiping the financier crumbs off my keyboard.

Tuesday, March 8, 2011

Contest Winner, Melktert, and a Friend

Thank you all for stopping by and entering my little giveaway and thank you so much to you who shared your GF&DF recipes, I really appreciate that. It was awesome to hear your stories and what you'd do with the GC, but unfortunately I only have one to give out. After tallying up the entries and feeding them to random.org, the winner is Melinda!


Melinda, I left a message for you over at your blog. Please shoot me an email and I'll get you the redemption information right away. As for the rest of you, don't worry. I'm planning on a lot more giveaways in the weeks to come, so stick around, you never know what you'll get.

And while you're here, how can I possibly let you go without a recipe? A few weeks ago, or was it months? Wow, the time really has whipped through the last few months...anyways, a few whatevers ago I was invited to a little celebration at a friends house and she requested that I make a milk tart. A what what? A South African dish called a melktert, also known as a milk tart. I had no clue what the heck it was but I promised to have one in hand when I showed up. I dug around online and almost all the recipes sounded basically the same until I found Cook Sister! I liked that she lightened her tart and messed with the flavors a bit by adding cardamom, and while in the end I learned that I'd probably prefer the more traditional shortbread crust to the puff pastry, despite it's humble looks, the filling was really really REALLY good.

SA Milk Pie

Melktert
Recipe adapted from Cook Sister!
I didn't have custard powder handy and I wanted a tiny bit stronger cardamom flavor so I tossed in an extra pod, other then that I left the recipe untouched.


about 200g of ready rolled puff pastry
1.5 cups milk
1 tsp butter
a pinch of salt
1 cinnamon stick
2 green cardamom pods
1.5 tsp cornstarch
1.5 tsp cake flour
1 Tbsp cold milk
1/4 cup sugar
2 eggs, separated
1/4 tsp almond extract (optional)
sugar mixed with a little ground cinnamon

- Pre-heat the oven to 400F and line a 9 inch fluted pie dish with the puff pastry, leaving the edges raggedy and hanging over the edge of the dish. Bake the shell for 10 minutes to get it cooking. I skipped this step and the bottom of my shell wasn't quite cooked through when the custard was ready...there was some rather creative pie frying that had to happen after that to finish off the bottom, so please, listen to me and don't skip this step.
- Bring the milk to a slow boil in a medium saucepan, then add the butter, salt, cinnamon stick and cardamom pod.
- Combine the cornflour and cake flour and add the cold milk to make a paste. Stir a little of the hot milk into the paste to thin it, then stir the custard paste into the hot milk in the saucepan. Make sure there are no lumps in the paste - and don't panic too much if there are some lumps in the saucepan once you've added the custard - just make sure you stir vigorously and continuously to get them to dissolve.
- Add 2 Tbsp of the sugar and stir/whisk continuously. When the custard thickens, remove it from the heat and discard the cinnamon and cardamom.
- Beat the egg whites until stiff, then beat in the remaining sugar gradually and set aside. Beat the yolks slightly and then add about 2 Tbsp of the warm custard mix to the yolks and mix well.
- Stir the yolk mix into the custard saucepan and add the almond essence (if using). Gently fold in the egg whites.
- Pour into the pie dish, sprinkle with cinnamon sugar and bake at 400F for 10 minutes. Then turn the heat down to 350F and bake for a further 10-15 mins, until puffed up and golden.
- Allow to cool on a wire rack, or in your car on the way to the party, slice and enjoy!


And just to see if you're all paying attention (or even reading this far down in the post), I'd like to share with you my friend the croc:

I've got my eye on you

I've been looking for a smooth lead-in to share him with you for a while, mostly because I really like how this picture came out, and I've basically given up. So here he is. He didn't get any of the tart, but I'm pretty sure he'd have liked it. Go on, bake some yourself. Make him jealous.

Tuesday, March 1, 2011

S'More Cookies and a Giveaway

I am such a slacker. I mentioned that I'd be having a giveaway in my last post and then got completely sidetracked by other stuff, well wait no more! I'm officially opening up the giveaway for entry and the prize is a $50 GC to anything your little heart desires from CSN Stores. For example, it could go a long way towards getting a few (and I mean very few, these things are pricey!) of these adorable little guys or maybe a dozen of these cuties. And all you have to do to throw your hat into the ring is:

1. Leave a comment telling me what you'd get with your $50 CSN Stores GC. It doesn't have to be food related, but hey, that's what my blog is about, so let's face it, it probably will be ;)
2. Make sure you leave contact information in your post! Be it your email or a link to your blog/site/profile where I can find your email. If I don't have a way to contact you in 2 days after the contest closes, I'll be forced to pick a different winner...and quite frankly that involves more work for me. Have I mentioned the laziness?
3. Bonus Entry: A friend has recently asked me for gluten and dairy free recipes and while I have one, I'm seriously lacking in that department. So, if any of you have good recipes you're willing to share or great sites you know of (my favorite so far is the infamous Mrs. Tartlette), let me know and I will give you an extra chance to win!

You have until midnight CST on March 7th to get in your entries. Good luck!

Contest is now closed and the winner will be announced shortly. Thank you all for participating!

Whew! And now onto the reason you guys come here, the recipe! There isn't much of a story that goes with these, I felt like making S'More cookies, so I did. I had a box of graham crackers lying around and I whipped up a batch of strawberry marshmallows to fill. Dunked into a vat of melted chocolate and allowed to dry these were pretty good. I might pipe on a lot more marshmallow onto these next time and maybe slip in an extra disk of chocolate, but they were quite tasty as is.

SmoreCookies

S'More Cookies
Marshmallow recipe from Martha herself

Graham Crackers, carefully broken into squares
2 envelopes unflavored gelatin
1/4 cups granulated sugar
1/3 cup seedless strawberry jam or jelly
1/3 cup light corn syrup
Dash of salt
Chocolate for dipping

1. Arrange the graham cracker squares on a flat surface. You want them to be ready once the marshmallow fluff is done or it will start to set before you get a chance to pipe.
2. Pour 1/3 cup cold water into the bowl of a stand mixer fitted with the whisk attachment. Sprinkle with gelatin; let stand until softened, 5 minutes.
3. Stir together granulated sugar, jam, corn syrup, salt, and 1/4 cup water in a medium saucepan. Bring to a boil, stirring often. Continue to boil until syrup registers 238 degrees on a candy thermometer (soft-ball stage).
4. Add syrup to gelatin. Beat on low speed until slightly cooled. Gradually raise speed to high, beating until mixture is cool and peaks form, 20 to 30 minutes. You can mix in red food coloring if you like, one drop at a time, to achieve desired shade of pink, but I skipped it and still got a very soft pink hue.
5. Working quickly, spoon the fluff into a pastry bag fitted with a large plain round tip and pipe a square of fluff just inside the edges of each graham cracker.
6. Let the marshmallow set for an hour or so to dry. Melt the chocolate in the microwave in 30 second intervals, or in a bain marie, and start dunking. I only wanted the chocolate on top but you can do whatever you like here. Dunk the top or the whole thing, it's up to you. I also sprinkled a few graham cracker crumbs on top to make it pretty(and cover up my bumpy marshmallow piping job).
7. Allow the chocolate to set either on the counter at room temp, or slide the tray into the fridge/freezer for a few minutes to speed things up.

That's it! You now have perfectly portable S'More Cookies. Enjoy :D