Showing posts with label breakfast. Show all posts

Tuesday, June 1, 2010

Bakewell What?


I hope you've all had a wonderful and relaxing Memorial Day weekend! There's nothing better then an extra day off work...unless you love your job, in which case I'm sure you still had fun. I spent the day at my parent's house where they unintentionally attempted to recreate the experience of a traditional churrascaria. While my dad whipped up lamb, chicken and pork kebabs on the grill, my mother, worrying about possible rain, roasted up a rack of lamb in the oven. Add to that three watermelons (everyone brought one worrying there wouldn't be enough) and enough dessert to send a person into a sugar coma, and you'll have an idea of what my Monday afternoon looked like.

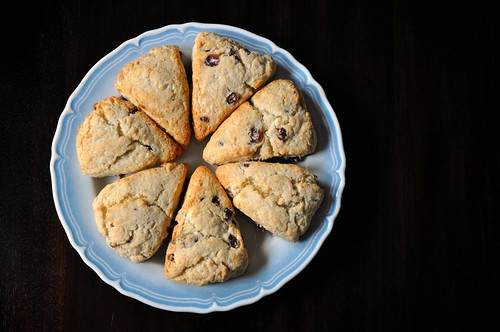
Wanting to contribute, along with my watermelon contribution, I decided to make a Bakewell tart and use up the last jar of last summer's strawberry jam. This was a baking challenge a few months ago for the Daring Bakers and I had everything needed on hand, which made it perfect for a last minute treat. I used Tartlette's version of the tart, swapping the jams and simplifying the crust process by using a food processor. When making tarts, you can't go wrong with a recipe from someone who named her blog after them, and I think they turned out fantastic. I did have a hard time trying to explain to my family what the heck they were though. I mean isn't it sort of preposterous to say that the tarts are baked well? It's not like they're ruined steaks or something. Otherwise, it was a very easy and a very quick recipe to make, and I think wrapped up in a bit of wax paper, they'd make great "to go" treats to share. Leave the explanations for some other day.

P.S. I'd have shown you the beautifully layered inside of the tarts, but they disappeared pretty quickly, so you'll just have to make them yourself.

Bakewell Tart


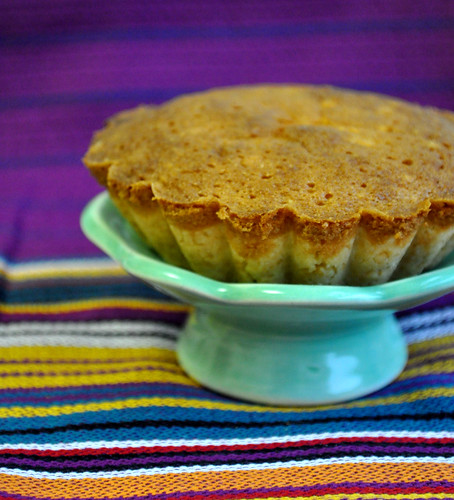
Strawberry Bakewell Tarts
adapted from Tartlette

Notes: I'm listing the measurements and steps as I used them, but feel free to check out her instructions if you wish. I'm starting to prefer to weigh everything instead of going by cups/teaspoons.

Makes six 3-inch, two 2-inch, and one 6-inch tart...or 10 3-inch tartlettes

Sweet shortcrust pastry:
8oz all purpose flour
1oz sugar
1/2 tsp salt
4oz (1 stick) unsalted butter, cold
2 egg yolks
1/2 tsp almond extract (optional)
1-2 Tbsp cold water

Frangipane:
4.5oz unsalted butter, softened
4.5oz icing sugar
3 eggs
1.2 tsp almond extract
4.5oz ground almonds (or other nut of your choice)
1oz (2 Tbsp) all purpose flour

Jam or preserve of your choice (I used homemade strawberry jam)

Prepare the dough:
Sift together flour, sugar and salt into the bowl of a food processor. Cut up the cold butter into small cubes and dump into the bowl. Using just a few quick pulses, incorporate the butter into the flour until the mixture resembles bread crumbs. Set aside. Lightly beat the egg yolks with the almond extract (if using) and quickly mix into the flour mixture. Pulse two or three times. Keep pulsing while dribbling in the water, only adding enough to form a cohesive and slightly sticky dough.
Form the dough into a disc, wrap in saran wrap and refrigerate for at least 30 minutes.

Prepare the frangipane:
Cream butter and sugar together for about a minute or until the mixture is very light in color and very fluffy. Scrape down the side of the bowl and add the eggs, one at a time, beating well after each addition. The batter may appear to curdle, but it's okay, it'll come back together. After all three are in, pour in the almond extract and mix for about another 30 seconds and scrape down the sides again. With the beaters on, spoon in the ground nuts and the flour. Mix well. The mixture will be soft, keep its slightly curdled look (mostly from the almonds) and retain its pallid yellow color.

Assemble the tartelettes:
Place the chilled dough disc on a lightly floured surface. If it's overly cold, you will need to let it become acclimatised for about 15 minutes before you roll it out. Flour the rolling pin and roll the pastry to 5mm (1/4”) thickness, by rolling in one direction only (start from the center and roll away from you), and turning the disc a quarter turn after each roll. Don't worry too much if it rips, you wan always just fix it up in the molds. When the pastry is to the desired size and thickness, transfer it to the tart pans, press in and trim the excess dough. Patch any holes, fissures or tears with trimmed bits. Place the tarts on a baking sheet line with parchment paper and chill in the freezer for 15 minutes.

Preheat oven to 400F. Position a rack in the center of the oven.

Remove shells from freezer, spread as even a layer as you can of jam onto the pastry base. Top with frangipane, spreading to cover the entire surface of the tart or the jam will escape and burn. Smooth the top and pop into the oven for 30 minutes. Five minutes before the tart is done, the top will be poofy and brownish. Eat them warm or at room temp. Either way, they're great.

Thursday, May 27, 2010

Move Over Nutella


Well, not quite. It'd take an awful lot to displace it in my mind, I mean it does combine two best things that were ever spread on a piece of toast. But this! Have you ever flown on one of the European Airlines and received those spiced cookies in place of the peanuts? The ones that kind of reminded you of molasses cookies, but better? Well, imagine those cookies blended into a luscious spread that you can cover a banana waffle with. That's what David Lebovitz talked about a few weeks ago, and he painted such a fantastic image, that I had to go and get a jar for myself. Well, they were on sale...and then I found a coupon...and then I had to justify shipping...so now I'm the proud owner of 4 jars of this stuff and I must say, David did not disappoint.

Biscoff Spread Waffle

So while I don't really have a recipe for you today, I do have a recommendation. Go here and get a few jars for yourself. Believe me, you'll be glad you did.

Biscoff Spread Jar

Wednesday, May 26, 2010

Breakfast Time...Again


French Granola with Milk

I know I already wrote about making granola, but I have a new favorite and I had to share. It's lighter, easier and faster, plus if you allow for a small degree of whimsy, it's French. I found the recipe a while ago and it seems that like with a fine wine, I let all my recipes "age" before I actually pull them out and try them. But I've now made this twice and shared it with friends, and it has come out a hands down favorite. The tiny bits of chocolate make it indulgent without being over the top and the honey gives it all the sweetness it needs. I added some wheat germ to the mix to round out the health benefits, and as long as you don't fill up your bowl too much, it makes for a fantastic everyday cereal. I may never buy Honey Bunches of Oats ever again.

French Granola

French Chocolate Granola
adapted from Orangette
Yield: about 5 cups

3 cups rolled oats
1/2 cup raw almonds, chopped
1/2 cup unsweetened shredded coconut
1/2 cup wheat germ
1 Tbsp sugar
Pinch of salt
7 Tbsp mild honey
2 Tbsp vegetable oil
1/2 cup, finely chopped bittersweet chocolate or mini chocolate chips

Preheat the oven to 300°F.

In a large bowl, combine the oats, almonds, coconut, wheat germ, sugar, and salt. Stir well to blend.

In a small saucepan, warm the honey and oil over low heat, whisking gently until the honey is loose. You can also do this in the microwave, just make sure that you take it out whisk every 20 seconds. Pour over the dry ingredients, and stir to combine well.

Spread the mixture evenly on a rimmed baking sheet. Bake for about 20 minutes, or until golden. Set a timer to go off halfway through the baking time, so that you can give the granola a good stir; this helps it to cook evenly. You may need to bake it for a few extra minutes to get an even golden color, but make sure you don't let it go too long or it will burn. When it’s ready, remove the pan from the oven, stir well – this will keep it from cooling into a hard, solid sheet – and cool completely.

When cool, transfer the granola to a large bowl, storage jar, or zipper-lock plastic bag. Add the chocolate, stir (or shake, if using a jar or bag) to mix and store in an airtight container. Don't worry, it won't last long.

Monday, April 12, 2010

Sunny Marmalade

I was still bleary eyed and half asleep as I got off the train, and while I was moving on autopilot and not paying any attention to where I was going, I could not miss that crate. The sign said "Sunny Lemons - 10/$1" and the huge box was filled with fat round lemons, all shiny and bright. They seemed to be saying: "It's okay, you go to work, but be sure to stop by on your way back and take some of us home with you". The sight of those lemons stayed with me all day. I mean, what's so special about "sunny" lemons and what the heck would I make with that many? Were they anything like Meyer Lemons? They were definitely smaller and rounder then the regular variety. I thought about it all day and by the time I was heading back to the train, I had a plan. I spoke to the grocer and he confirmed my suspicions, while they weren't exactly Meyer Lemons, they were sweeter then the regular variety, and therefore would be close enough for me. I grabbed 20 of the prettiest and raced up the stairs, barely making my train.

Once home I spread the loot and got to work. I sliced and diced and seeded 16 of the lemons. Let me stop and give you a bit of advice here: Don't do this if you have any cuts on your fingers! Boy oh boy will you feel the burning stinging pain of the acid burrowing into your flesh. What was I thinking? I bought flesh-eating lemons! Come to think of it, that would be a pretty good name for a band. Flesh Eating Lemons, coming soon to the local pizza joint near you.

Back to the recipe. I measured (I was a bit over, but oh well), dumped everything into a pot, poured in the water...and read the step that said to leave it overnight. Sigh. So much for getting things done in one day. I guess I'll be able to catch up on some of those "30 Rock" episodes.

The next day I went out with some friends and came home kind of late. Would I be able to leave the jam for yet another day? I didn't think so, so I added the rest of the ingredients and cranked up the heat. Another note, make sure that you have lots and lots of space in the pot because as the mixture begins to boil, it will rise. A lot. I doubled the recipe and overestimated the size of my pot, so I was up late into the night watching the simmering pot, but once it was done I had eleven and a half fragrant, slightly bitter, not-too-sweet marmalade. Just look at those tiny flecks of vanilla seeds! It set beautifully and I'm sure it'll be great on a waffle. But for now, it's bed time.

Vanilla Lemon Marmalade

Lemon and Vanilla Bean Marmalade
via Epicurious

1 1/4 pounds Meyer lemons (or whatever you can get your hands on)
5 cups water
5 1/2 cups (about) sugar
1 vanilla bean, split lengthwise
Pinch of salt

- Working on large plate to catch juice, cut lemons in half lengthwise, then very thinly crosswise. Discard seeds. This will take some time, but do be careful, no one likes to find seeds in their jam, plus it can make things very bitter.
- Pack enough lemons and any juice to measure 2 1/2 cups. Transfer to large nonreactive pot, add 5 cups water and bring to boil.
- Reduce heat to medium and simmer for 10 minutes. Remove from heat and let stand uncovered overnight.

- The next day measure lemon mixture (there should be about 5 1/2 cups). Return to same pot. Add equal amount of sugar (about 5 1/2 cups).
- Scrape in seeds from vanilla bean and add the bean with a pinch of salt.
- Bring to boil, stirring until sugar dissolves. Attach clip-on candy thermometer and maintaining active boil and adjusting heat to prevent boiling over, cook until temperature reaches 220°F, stirring occasionally, at least 30 minutes. I doubled the recipe and underestimated the extra room it would need to properly boil and therefore it took a lot longer to reach the necessary temperature (about 2 hours), but it worked out great in the end.
- Pour into sterilized jars, seal and let cool. The lemons are very high in acid so you should not need to process the jars, but you can if you want to be on the safe side. If you don't want to seal them, the jars will keep refrigerated for a few weeks, just be sure to bring to room temperature before using. Oh, and don't forget to share.

Tuesday, March 23, 2010

Scones to Build a Brunch Around


Scones

You're probably really sick of me talking about breakfast, so I'll move on. Who wants to talk about brunch? I know, I know, I didn't get far from the breakfast topic, but brunch is my favorite time to have people over. Well, brunch and just because. The day is just starting, the food can be comforting and no one is falling asleep at the table. You can pour out cups and cups of coffee, play games, or just chat, and if you happen to have gone a bit overboard with the menu, that just means your guests will stay longer. It's hard to leave when you can't even stand up.

Scones

One more recipe has recently entered my "must make for brunch" repertoire, and that is this one for the best scones ever. If you only know scones from those hard lumps they sell at Starbucks, you will be pleasantly surprised. These are tender, crumbly, and just a little sweet, so they go great with a bit of butter or a slick of your favorite jam.

Scones

They're enormously easy to make, and you can probably try them with any kind of fruit or even mini chocolate chips, which gives me an idea for what to try next. But the first time you make these, I'd recommend using the original recipe. It's wonderful and will make a great addition to your breakfast, brunch or any time table.

Scones

Dreamy Cream Scones
America’s Test Kitchen Cookbook via Smitten Kitchen

2 cups (10 ounces) unbleached all-purpose flour
1 tablespoon baking powder
3 tablespoons sugar
1/2 teaspoon salt
5 tablespoons chilled, unsalted butter, cut into 1/4-inch cubes
1/2 cup currants (I used dried cranberries, and chopped them into smaller bits)
1 cup heavy cream

1. Adjust oven rack to middle position and heat oven to 425°F.

2. Place flour, baking powder, sugar and salt in large bowl or work bowl of food processor fitted with steel blade. Whisk together or pulse six times.

3. If making by hand, use two knives, a pastry blender or your fingertips and quickly cut in butter until mixture resembles coarse meal, with a few slightly larger butter lumps. Stir in currants. If using food processor, remove cover and distribute butter evenly over dry ingredients. Cover and pulse 12 times, each pulse lasting 1 second. Add currants and pulse one more time. Transfer dough to large bowl.

4. Stir in heavy cream with a rubber spatula or fork until dough begins to form, about 30 seconds.

5. Transfer dough and all dry, floury bits to countertop and knead dough by hand just until it comes together into a rough, sticky ball, 5 to 10 seconds. Form scones by either a) pressing the dough into an 8-inch cake pan, then turning the dough out onto a lightly floured work surface, cutting the dough into 8 wedges with either a knife or bench scraper (the book’s suggestion and what I did) or b) patting the dough onto a lightly floured work surface into a 3/4-inch thick circle, cutting pieces with a biscuit cutter, and pressing remaining scraps back into another piece and cutting until dough has been used up. (Be warned if you use this latter method, the scones that are made from the remaining scraps will be much lumpier and less pretty, but taste fine.)

6. Place rounds or wedges on ungreased baking sheet and bake until scone tops are light brown, 12 to 15 minutes. Cool on wire rack for at least 10 minutes. Serve warm or at room temperature.

Friday, March 12, 2010

Granola and Tie Dyes and More Things Breakfast


I think I might still be on the breakfast track of thought because this obsession is starting to take over dinner plans as of late. And the whole "everything homemade" thing is starting to make me feel a bit hippyish. No, I haven't started wearing tie dyed shirts and skirts and socks, I left all those behind sometime after junior high, but I have dipped my toes in granola making. Actually, considering the quantity of granola that I made, it wasn't just a toe, I'm in knee deep, and I love it. Who knew it was so easy? Not to mention that the process turned my house all warm and cozy with the smells of a bakery without the calories. It might call for an odd ingredient or two, but it makes a ton, is infinitely flexible and delicious and quite a bit cheaper then the store bought kind.

Homemade Granola

I stumbled onto this recipe here and seeing as how it was the first gorgeously warm day, I jotted down the ingredients, pulled on my shoes, left my coat hanging on the chair and took a long walk down to Whole Foods. Nothing feels better then the first coat-less warm day. It's like breathing through your skin. Like running around the house opening all the windows and finally letting all the stale winter air out and letting the spring in. But I digress, back to the granola. Once back home, I spread out the loot and got to work. I have to tell you, the process couldn't be simpler. You mix in all the dry stuff, mix all the wet stuff, combine, and bake. You do have to stir the mixture up every 10 minutes so that it dries evenly and doesn't clump up, so I stayed in the kitchen and made a large pot of iced tea. What better way to welcome spring? I highly recommend it.

Granola Pre-Baked

Homemade Granola
adapted from Nigella Lawson’s Feast via Orangette

Dry ingredients
5 cups rolled oats
3 cups raw almonds or pecan halves, or a mixture of any nut you like
1 cup hulled raw sunflower seeds
3/4 cup sesame seeds (I added this, but I'm not sure if I will again...it didn't add much)
3/4 cup light brown sugar
2 tsp. ground cinnamon (I might add a bit more next time)
1 tsp. ground ginger
1 tsp. salt

Wet ingredients
3/4 cup unsweetened apple sauce
1/3 cup brown rice syrup (I found it by the honey in Whole Foods)
1/4 cup honey
2 Tbsp. vegetable oil, such as canola or safflower

Mixins
1 cup raisins, chopped apricots, dried cherries, cranberries, or anything else you like

Set racks in the upper and lower thirds of the oven. Preheat the oven to 300°F.

In a large bowl, combine all of the dry ingredients. Stir to mix well. In a small bowl, combine all of the wet ingredients. Stir to mix well. Pour the wet ingredients over the dry ones, and stir well. See? I told you this was easy.

Spread the mixture evenly on two rimmed baking sheets. Bake for 35 to 40 minutes, or until evenly golden brown. Set a timer to go off every ten minutes while the granola bakes, so you can rotate the pans and give the granola a good stir; this helps it to cook evenly. When it’s ready, remove the pans from the oven, stir well – this will keep it from cooling into a hard, solid sheet – and set aside to cool. The finished granola may still feel slightly soft when it comes out of the oven, but it will crisp as it cools.

Add about a cup of any dried fruit you like, I added raisins, and scoop into to a large zipper-lock plastic bag or other airtight container. Store in the refrigerator indefinitely, but trust me, it won't last that long.

Wednesday, March 10, 2010

All About Breakfast


Bananas

I love breakfast. It's by far my favorite meal of the day. It's so friendly and it even plays nice with lunch and hosts fabulous brunches on the weekends. It shares with you smoky bacon, luscious omelets, gooey eggs benedict, saccharine french toast, and heaping bowls of fresh fruit. How can you not love it? Right now though, my favorite player is a humble waffle.

I'm a bit late in telling you this, okay, very late, but last month a group of food bloggers got together and created a small cookbook to raise money for Haiti. I'm pretty sure it's no longer up for sale, but I was able to nab one at the last minute. For one, I can tell you that I'll definitely be ordering from Blurb. The quality of the book was phenomenal. But even better, the book was chock full of fabulous recipes, including this one for yeast based banana waffles. I made them for my dad's birthday brunch this past weekend along with some other goodies I'll be making again to share with you later, but the waffle maker called to me from the shelf, asking to be used again.

The nice thing about making your own waffles is that you can always freeze the ones you don't eat, so don't halve the recipe, even if you're making them just for yourself. You'll be able to pull them out and pop them into the toaster, the same way some people pop in Eggos. It's cheaper, just as convenient, and I promise you, these dimpled takes on Banana Bread in a waffle form are a whole heck of a lot yummier.

Banana Waffles

Banana Bread Yeasted Waffles
From Seven Spoons via BlogAid for Haiti cookbook

4 tbsp unsalted butter, melted
1 cup plus 2 tbsp milk
1 tsp vanilla extract
2 cups all-purpose flour
1 tbsp dark brown sugar, packed
1 1/2 tsp yeast
1/2 tsp salt
1/2 tsp ground cinnamon
1/4 tsp ground nutmeg
1/8 tsp ground ginger
Pinch of ground clove
2 eggs, beaten lightly
1 cup mashed ripe bananas, about 3 whole
2 tbsp sour cream or greek yogurt

Warm up the milk a little bit and in a small bowl, whisk together the butter, milk and vanilla. Set aside, the mixture should be warm but not hot. If you don't warm the milk, the melted butter will solidify as soon as it's mixed...and that will sort of defeat the purpose.

In a large mixing bowl, sift or whisk together the flour, brown sugar, yeast, salt and spices. Pour the wet ingredients into the dry, whisking until smooth. Stir in the beaten eggs. Cover the bowl loosely with saran wrap and refrigerate for at least 12 hours, but up to 24.

About 30 minutes before you want to make waffles, take the batter out of the refrigerator to come up to room temperature slightly. It should be doubled in size and the surface will be covered in bubbles. I forgot to do this the 2nd time I made them and I just needed to cook them a little longer, so if you're as absentminded as I am, all is not lost...at least where these waffles are concerned.

When ready to begin, stir the sour cream into the mashed bananas and then mix the fruit into the batter. It will deflate a bit, but don't worry, just use a light, quick hand to thoroughly combine.

Heat your waffle iron and bake the waffles as per the manufacturer's instruction.

I was able to get about a dozen waffles out of it...I ate one or two right off the iron, so I'm not counting them.