Showing posts with label jam. Show all posts

Wednesday, September 8, 2010

Watermelon Jam

Have you ever come across a recipe so unique and intriguing that you just had to run out and get everything you'd need to give it a try? Well, when Stef from Cupcake Project was searching for the best way to get the flavor of watermelon into a cupcake, her friend Marissa from Food in Jars got to work and came up with a watermelon jelly. Watermelon jelly say what? I had to try it. The ingredients were simple, and I always have watermelon within reach during the summer, so I ran home cut one up into chunks and got to work. I followed the recipe to the letter, but even two days later the contents of my jars still resembled more of a runny sauce then a nice thick jam or jelly. I think I got a bit nervous at the smell the jam was taking on and I may have not cooked it as long as I should have.

Once I was sure that it just will not set no matter how long I waited, I reopened all the jars and dumped everything back into the pot. I added a bit more lemon juice to try and cut the sweetness and boost up the pectin, and recooked the mess to 215F again, letting it boil for a bit longer then I was strictly comfortable with, but this time everything came out great! The jam set and I had 7 shiny jars of lovely jelly tasting quite strongly of watermelon. I'm already plotting "I know what you did last summer" desserts to make with it, and I am keeping my fingers crossed that my jam exchange partner will like it too.

Watermelon Jam

Watermelon Jelly
adapted from Food in Jars
makes about 7 eight ounce jars


6 cups pureed watermelon (remove any seeds prior to pureeing)
5 cups white sugar (I think next time I'd add 4 or less)
1/2 cup bottled or fresh lemon juice
1 packet powdered pectin

Combine watermelon puree, sugar and lemon juice in a large, non-reactive pot (anything but aluminum). Get one bigger than you think, you'll want plenty of space for things to foam up without overflowing. Bring to a boil and let it boil vigorously until the temperature of mixture reaches 220 degrees. Be sure to stir frequently, you don't want it to burn on the bottom. Add the powdered pectin and boil for another five minutes.

Remove from the heat and pour into clean, sterilized jars, leaving about a half inch of headspace. Wipe rims, apply lids and screw on bands. Process in a boiling water bath for 10 minutes.

When time is up, remove from canner and let jars cool completely, preferably overnight. When they’re cool enough to handle, remove rings and test seals. You can eat immediately or store unopened jars in a cool, dark place for up to a year. Print up some pretty labels (I used the template from here found at this cool site) and start scheming.

Saturday, August 21, 2010

Blackberry Wine Jam and a Bit of Silliness

What's that you say? There's been too much jam and not enough booze on this site? Well that's just silly! There was booze in the peach jam, wasn't there? Oh, alright. How about ... more jam with booze! See what I did there? I made me making more jam YOUR idea. I'm sneaky like that.

Blackberries

You see, last weekend I once again braved the great mosquito forest to forage for some berries. Makes me sound kind of like a bear, doesn't it? Moving on. There were no more blueberries left, I guess that season is over around here (boo), but there were still a few raspberries left and great big blackberries just starting to ripen. My friend and I picked a few pints before throwing our hands up in the air and declaring the mosquitoes as the winners of the day yet again. Either that or the "friendly" chicken chased us out. Not sure.

Nope its a chicken

The raspberries went in my tummy, but the blackberries sat in the fridge for a bit. I had thoughts of blackberry peach pies, pretty little tarts and whatnot, but all that requires the use of the oven...and my oven in on summer break. It's too hot. Granted some may argue that making jam isn't exactly "cool" work, but that's neither here nor there, so I made more jam. I was going to make a just-blackberry jam, like this one (aren't those jars adorable?), then I considered one with honey and black pepper, and then I passed a bottle of Pinot Noir as it was trying to sneak out of the house. I grabbed him by the neck, twisted out the cork and poured the contents into a small pot set over a medium flame (minus a glassful for me of course). There'll be no sneaking out of this house!

Blackberry Wine Jam

Do you remember when the movie Chocolat came out many years ago and everyone went crazy over it? The book was being read in every book club. Well, I didn't see the movie or read that book, but I did read every single other book that author has written right then and there. My favorite was Five Quarters of the Orange, but Blackberry Wine came as a very close second and I think that wrapped along with a jar of this jam it would make a lovely gift.

Blackberry Wine Jam with Tea

I've also just discovered that I have been neglecting this author and that she's been very busy these past few years churning out book after book. I guess I'll have to catch up :D

Blackberry Wine Jam with Tea 2

Blackberry Wine Jam
by me
Makes about 13 eight ounce jars of jam.
Note: I added a lot of wine, so the flavor is strong. Feel free to cut the amount down to a cup or two (pre-reduction) for a more blackberry then wine sort of a jam. It will still be wonderful.

5 pounds of blackberries, washed and patted dry
5 cups of sugar (a bit more if your berries aren't very sweet)
5 tablespoons of lime juice
1 bottle of a not too pricey Pinot Noir or really any red wine that you like
1 box of no sugar needed pectin

- Thoroughly clean all of your jars before you start. Sterilize setting on the dishwasher is fine, but you can also boil them or wash with hot soapy water and dry in the oven. Whatever you pick, just keep those suckers super clean.
- Unceremoniously dump all the fruit into a large pot, top with sugar, and pour in the lime juice.
- Set a smaller pot on the stove over medium heat, pour yourself a nice full glass of wine (you'll need something to keep you company while the jam is cooking), and dump the rest into the smaller pot. Simmer until it has reduced to about a third of it's original volume and don't forget to occasionally give it a stir.
- Back to the big pot. Light the fire under it on high and then smash, mash, blend and basically abuse the mixture inside until it gets to the consistency you like. I like mine smoother so I brought out my immersion blender again and brrrrrrr'd the whole thing.
- Stir this often and once it reaches a full boil, stand very close to it (it could boil over if you don't pay attention) and stir stir stir for about 10 min. By now your wine should be nice and reduced, so go ahead and add it to the fruit.
- Dump in the pack of pectin and keep stirring to incorporate. Cook for 2 minutes and then take off the heat.
- Ladle the hot jam into jars, seal and then process in a water bath for 10 min. You should hear most of the jars popping on the counter as they cool, but if the next day there's any that didn't seal, just put it into the fridge and enjoy it over a cup of tea, a good book, and a hot english muffin...of whatever variety you choose ;)

And for those of you who actually read this far, this is what happens when you're trying to take pictures in a tiny kitchen and happen to not possess a single ounce of balance or grace and happen to bump your entire set with your deriere and knock the precariously balanced toast with jam...right into the steaming cup of tea. Makes for a tasty, if somewhat soggy, snack for that very same graceless so-and-so.

Blackberry Wine Jam Ooops

Disclaimer: I am sick and this post was written while under the influence of cold medicine and after several hours of surfing from one children's book illustrator's blog to another. I'm feeling all sorts of loopy and whimsical.

Thursday, August 19, 2010

Vanilla Bourbon Peach Jam

You guys are going to get sick and tired of me and my jam, but I can't help it. Each time the jars cooling on the counter pop, letting me know they're sealed tight for the long haul, my heart skips with joy. Soon there won't be enough toast to support all these jars, but that's why there are friends and holidays and random gifts.

Steph over at Steph Chows is hosting a little jam exchange program. There are still a few days before I know who my exchange partner will be, but in anticipation, I couldn't help but look at all of last years traveling jam jars. While a lot of them looked yummy, one in particular stood out and I saved it to make "in the distant future". Well, welcome to the future.

Vanilla Bourbon Peach Jam 2

With peach season just starting, there are tons and tons of pretty peaches overflowing at fruit stands everywhere at extremely cheap prices. I got about 6 pounds for under $3, pulled up the recipe and got to work on Bean Town Baker's Vanilla Peach Bourbon Jam. Can I just tell you how much I love no sugar needed pectin? The first few jams I attempted were done without any commercial pectin, relying on the fruit and the sugar to set properly, and while it came out good, I was always worried that I'd end up with sauce instead of jam. And the one raspberry jam recipe that I tried to make without pectin came out good, but too sweet for me. This magical box gives me full control over the sweetness of the jam, all while more or less guaranteeing me the perfect set. How great is that?

My peaches were on the firmer side, so mashing them with a potato masher was sort of out of the question, plus I wanted a smoother consistency anyways, so I mixed the fruit with the sugar and lime juice, pulled out what is becoming one of my favorite kitchen tools, my immersion blender, and whipped the suckers into a coarse pulpy consistency. Once the mixture started getting hot, I dumped in the vanilla and stirred stirred stirred like crazy, the rest as they say is history. And now I have a dozen beautiful jars of jam cooling on the counter and emitting loud pops every minute or so to let me know they're settled in to wait for winter.

Vanilla Bourbon Peach Jam

Vanilla Peach Bourbon Jam
adapted from Bean Town Baker
Note: I adjusted the proportions a little bit, so I ended up with a dozen 8oz jars and a bit smaller pectin to fruit ratio, but it still came out fantastic.


Before you begin either wash jars in the dishwasher on the extra hot water cycle, or wash them with hot soapy water and boil them for 10 minutes, leaving them on dry or in the boiling water until you need them for your jam. This sterilizes the jar and lengthens the shelf life of your jam. I ran them through the dishwasher on the sterilize cycle.

1 package no sugar pectin - I used Ball No Sugar needed box
6 pounds peaches
4 cups sugar
6 Tbsp lime juice
1 vanilla bean, split and cut into 1-inch pieces
6 Tbsp bourbon - I used Jim Beam
1.5 tsp almond extract

- The recipe suggests you blanch the peaches in boiling water for 30 seconds, submerge in an ice bath and then slip off the skins, but my peaches were prudes and that method didn't work, so I just used a peeler. Chop the peaches roughly into 1/4 inch dice, removing the pits.

- Put the peaches, sugar, and lime juice into a large non-reactive pot and smash/blend the suckers into a rough pulp using either a potato masher or an immersion blender.

- Put the pot over medium-high heat, add the vanilla pieces and bring the peach mixture to a rolling boil, stirring frequently to prevent scorching. Boil for 1 minute, then add the pectin. Bring the jam to a rolling boil once more, stirring constantly, and boil exactly 1 minute.

- Remove the jam from heat. Stir in the bourbon and extract, ladle the hot jam into jars, and screw on the lids. Then set the jars on a rack in a large pot of boiling water--the water should be 1 inch above the jar tops. I just washed the pot I made the jam in (the only big pot I own), put the jars in, made sure they were under an inch of water and turned it on high.

- Bring the water to a gentle boil and boil the jars for 10 minutes. Then remove the jars from the hot water and set aside to cool. You should hear the lids popping within a few minutes of their bath.

- When the jam is cold, check the seals on the jars by pressing on the centers of the lids. If the lids do not spring back, they are vacuum sealed and the jam can be stored at room temperature. If the lid flexes, there is no seal, so store the jar in the fridge and enjoy it on a bagel in the morning. All of mine sealed, but I'm going to pretend one of them didn't and open it up tomorrow.

Friday, August 13, 2010

Raspberry Jam

Can I brag for a minute? Every once in a while I make a list and spend a day going to thrift stores, garage sales, estate sales, and antique stores searching for treasures. Usually I don't find anything. I'll pick up a few unique items here or there, but it's pretty rare that I find something useful. The last time I ventured out though I got three beautiful French canning jars in great condition and an unopened box of a dozen pint sized Kerr jars with pretty yellow lids! And all they needed was a thorough cleaning, a few new rubber rings and they can start a new life holding pickles and jam in my house. And all together they cost me less then you'd pay for one jar at a store today, so I'm being green and saving money, how cool is that?

Raspberry Jam 3


The point of this though is that yesterday I used up the last of the raspberries I picked a few days ago to make jam and it came out glorious! One of the things I hate the most about the store bought variety is that it's always way too sweet. I know that sugar is probably cheaper then fruit, but if I want raspberry jam, I want it to taste like raspberries, and these were amazing raspberries.

Raspberry Jam

This isn't exactly a recipe. Basically, I just mashed up and weighed all the fruit I had left, added a little less then a cup of sugar for each pound of fruit, squeezed in a couple of lemons and boiled it all with a box of no sugar needed pectin for 10 minutes. I processed the filled jars for another 10 minutes to be sure that it would last.

Raspberry Jam 2

The jam set up perfectly and tastes just like the fresh fruit. I'm already dreaming of a cold December morning, some toast, a bit of butter and this jam still tasting of summer. Sometimes it pays to plan ahead.

Monday, April 12, 2010

Sunny Marmalade

I was still bleary eyed and half asleep as I got off the train, and while I was moving on autopilot and not paying any attention to where I was going, I could not miss that crate. The sign said "Sunny Lemons - 10/$1" and the huge box was filled with fat round lemons, all shiny and bright. They seemed to be saying: "It's okay, you go to work, but be sure to stop by on your way back and take some of us home with you". The sight of those lemons stayed with me all day. I mean, what's so special about "sunny" lemons and what the heck would I make with that many? Were they anything like Meyer Lemons? They were definitely smaller and rounder then the regular variety. I thought about it all day and by the time I was heading back to the train, I had a plan. I spoke to the grocer and he confirmed my suspicions, while they weren't exactly Meyer Lemons, they were sweeter then the regular variety, and therefore would be close enough for me. I grabbed 20 of the prettiest and raced up the stairs, barely making my train.

Once home I spread the loot and got to work. I sliced and diced and seeded 16 of the lemons. Let me stop and give you a bit of advice here: Don't do this if you have any cuts on your fingers! Boy oh boy will you feel the burning stinging pain of the acid burrowing into your flesh. What was I thinking? I bought flesh-eating lemons! Come to think of it, that would be a pretty good name for a band. Flesh Eating Lemons, coming soon to the local pizza joint near you.

Back to the recipe. I measured (I was a bit over, but oh well), dumped everything into a pot, poured in the water...and read the step that said to leave it overnight. Sigh. So much for getting things done in one day. I guess I'll be able to catch up on some of those "30 Rock" episodes.

The next day I went out with some friends and came home kind of late. Would I be able to leave the jam for yet another day? I didn't think so, so I added the rest of the ingredients and cranked up the heat. Another note, make sure that you have lots and lots of space in the pot because as the mixture begins to boil, it will rise. A lot. I doubled the recipe and overestimated the size of my pot, so I was up late into the night watching the simmering pot, but once it was done I had eleven and a half fragrant, slightly bitter, not-too-sweet marmalade. Just look at those tiny flecks of vanilla seeds! It set beautifully and I'm sure it'll be great on a waffle. But for now, it's bed time.

Vanilla Lemon Marmalade

Lemon and Vanilla Bean Marmalade
via Epicurious

1 1/4 pounds Meyer lemons (or whatever you can get your hands on)
5 cups water
5 1/2 cups (about) sugar
1 vanilla bean, split lengthwise
Pinch of salt

- Working on large plate to catch juice, cut lemons in half lengthwise, then very thinly crosswise. Discard seeds. This will take some time, but do be careful, no one likes to find seeds in their jam, plus it can make things very bitter.
- Pack enough lemons and any juice to measure 2 1/2 cups. Transfer to large nonreactive pot, add 5 cups water and bring to boil.
- Reduce heat to medium and simmer for 10 minutes. Remove from heat and let stand uncovered overnight.

- The next day measure lemon mixture (there should be about 5 1/2 cups). Return to same pot. Add equal amount of sugar (about 5 1/2 cups).
- Scrape in seeds from vanilla bean and add the bean with a pinch of salt.
- Bring to boil, stirring until sugar dissolves. Attach clip-on candy thermometer and maintaining active boil and adjusting heat to prevent boiling over, cook until temperature reaches 220°F, stirring occasionally, at least 30 minutes. I doubled the recipe and underestimated the extra room it would need to properly boil and therefore it took a lot longer to reach the necessary temperature (about 2 hours), but it worked out great in the end.
- Pour into sterilized jars, seal and let cool. The lemons are very high in acid so you should not need to process the jars, but you can if you want to be on the safe side. If you don't want to seal them, the jars will keep refrigerated for a few weeks, just be sure to bring to room temperature before using. Oh, and don't forget to share.

Thursday, November 5, 2009

We be jammin'

No matter how much I try, I am a baker not a cook. I've always envied those that can step into the kitchen without a plan, swing open the fridge and produce the perfect, or at the very least edible, three course dinner. I end up swinging open the fridge door....and then making mac-n-cheese. With water, because I'm usually out of milk. Or ramen with whatever vegetable or herb is lying around hiding behind a row of colorful jars full of frosting leftovers. Whenever I have company coming, I always get very anxious and I research different dinner menus for days on end, make extensive shopping lists of things the cashiers can't pronounce, let alone know how to ring up, and run around like a chicken with it's head cut off (shoot, I forgot to buy the chicken!) trying to make sure that everything comes out just as the recipes, and numerous reviewers, promised. I don't know how, but my mother, who has entertained on many various occasions over the last few decades, always manages to put out a table groaning under all the assorted dishes with seemingly no effort at all. And should you ask her for a recipe, oh my, you better have a bit of patience. She speaks in ingredients, not quantities. The recipe for a herring spread, for example, will start with "send your father to the store" because no one else knows exactly what to get, how much to pay or how many to get and you're just doomed right away should you go without him. The rest of the recipe will go downhill for me because everything will depend on just how many herring he bought, how big they were, how low the tide was that month and how many chipmunks ran across the back yard driving our cat crazy in the last 14 minutes. These conversations inevitably send me running to google as I frantically enter the ingredients into the search box to see if anyone else has tried making this concoction.

Ripped up plums
This is exactly what happened when I asked for my mom's awesome plum jam recipe. Everyone loves when she makes it and my dad's only complaint about it is that it gets a bit runny making it hard to quickly fish out of the jar with a fork without getting caught (she keeps the fruit chunks big for him to think he's getting away with it). I came across a small mountain of perfectly ripe Italian plums at the store and since I've been on a small jamming frenzy lately, I called her to ask how she makes her jam.

Mom: "You'll need a lot of plums and some sugar and then just cook everything down"
Me: "But how much sugar do you add? How many cups of plums? How long do you cook it?"
Mom: "I don't know...how ever much you want and until it's done. Why are you making it anyways? I gave you a jar just the other day."
Me: "Sigh" and off to the internet

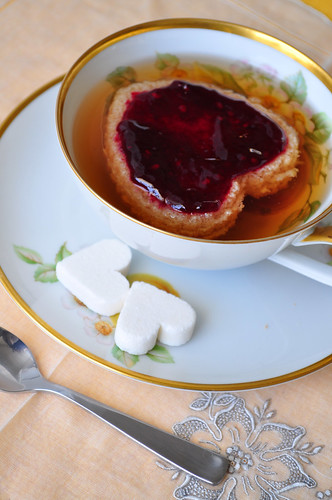
I was surprised to learn that there are not that many recipes out there for this jam, which is shocking because it's AWESOME! It goes great on pancakes, toast, inside crepes, with tea and a spoon, on waffles and I'm told it's even good with pork. I did find some reasonable recipes, but they seemed to add gimmicks, like cinnamon or Grand Marnier, which is nice, but all I wanted was straight up Plum Jam. Other recipes included a pound for pound ratio of plums to sugar...and that's just crazy, or at least way to sweet for my taste. I'll try not to judge. So I decided to combine a bit of what I've learned from the other jam recipes that I tried and just whip something up.

Since I wanted to repeat this experiment if it went well, I measured everything and the ratio that I came up with is 1 cup of sugar per pound of pitted fruit and a tablespoon of freshly juiced lemon. I like recipes that are easy to remember :D These are the amounts I ended up using and in the end I had about ten 8oz jars of yummy jam:

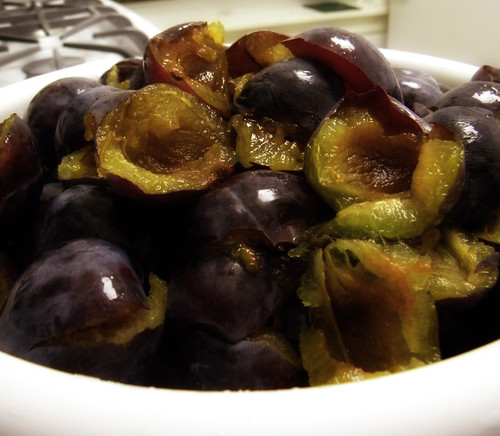
6 pounds of washed and pitted plums
6 scant cups of sugar
juice from 2 lemons

- The lemons are high in pectin and would make sure that the mixture jelled well even if I didn't want to thicken it with sugar. I ripped the plums into shreds using my fingers while I was pitting them. Why get a knife and a cutting board dirty? It's faster and more satisfying to do it by hand anyways. I then mixed all the ingredients and let the mixture stand for 30 min in the fridge. I mean, hey, it did wonders for the strawberry jam back in July, so it can't hurt here either, right?
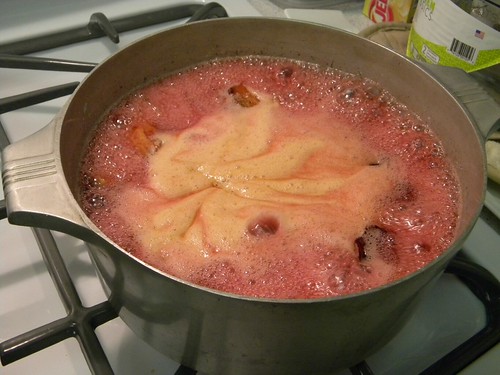
- Then I dumped everything into a huge pot, making sure there's plenty of room because the mixture will rise and bubble and you wouldn't want all your work to run away from you, turned the heat to medium and cooked for about 20 minutes until the fruit was very soft.

Cooking Plums
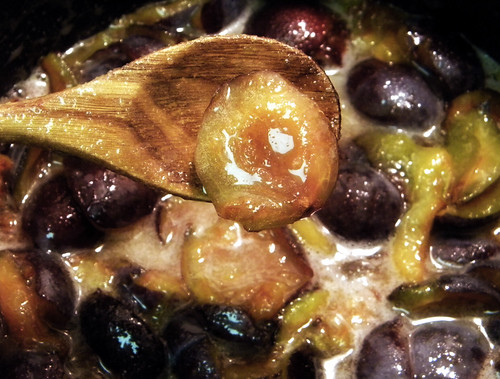
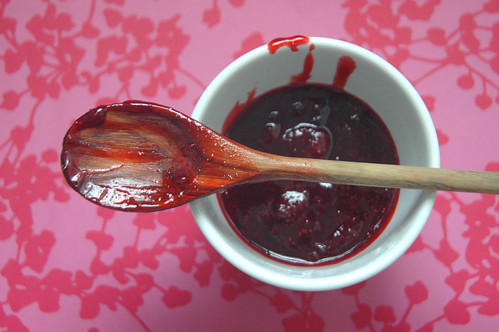
- I took it off the heat and used my immersion blender to smooth out the mixture into a rough pulp. You don't have to do this, but I wanted a more spreadable jam.
- I popped a plate into the freezer (this will make sense later) and put the pot back over medium heat, stirring constantly. Once it looked like it was getting to the right consistency (about 15 more minutes) I took the plate out of the freezer and dropped a few drops of the jam on it. Let the drop sit there for a bit and then nudge it with your finger. If it wrinkles, even a little, the jam is done. If it just runs away from your finger, it needs to be cooked a bit longer, so put the plate back into the freezer and test again in 5 minutes. You may want to skim the jam if it gets too foamy, but I got lazy and just kept stirring.

Foamy Jam
- Fill several clean jars within a half inch from the top with the jam and screw on clean, pre-boiled for 5 minutes, lids.
- Put your jars into a large canning pot and fill with water so that the water covers the jars by an inch. Put over high heat and once the water starts to boil, set the timer to 15 minutes. When the timer goes off, turn off the heat, fish out the jars with tongs and let them cool completely on a kitchen towel. I like to flip them upside down while they're cooling. This may not do anything, but I'm convinced it gives the jars a better seal. The tops should all pull in and not budge when you press them with your finger. If one of your jars doesn't seal properly, feel free to give it another hot bath, but I haven't run into this scenario yet, so I'm sure you have nothing to worry about.
- Make pretty labels, wrap in pretty paper, hide in the pantry or share with a friend, the jam should keep for a year...that is if it survives that long without getting eaten :D

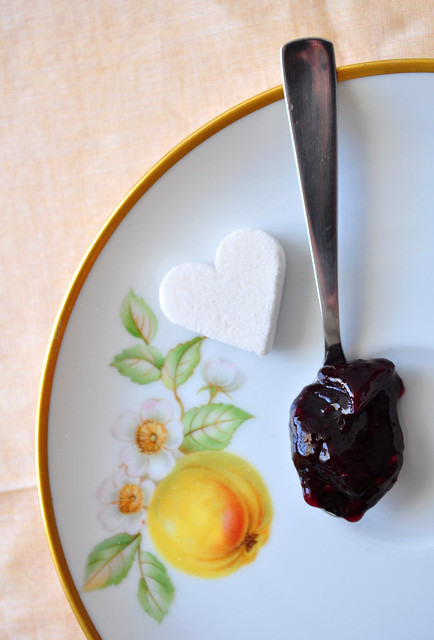
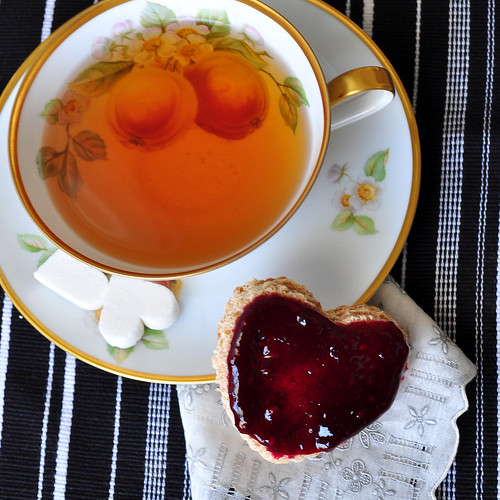
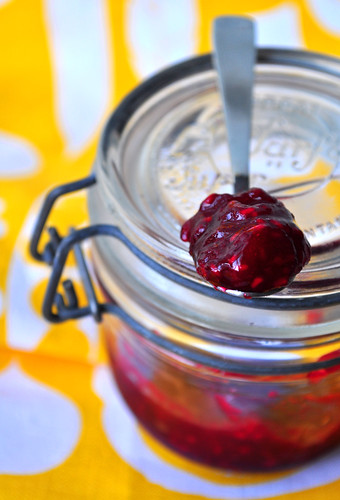
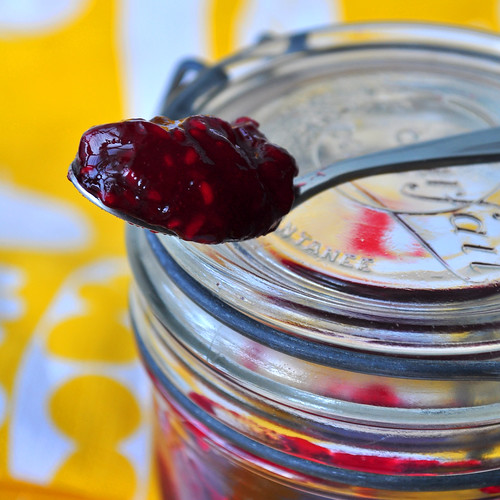
I'm still having camera problems and it was too late at night to make the jars all pretty, so you'll just have to take my word for it when I say the jam came out a perfect dark purple and looked and tasted just like my mom's, that is to say, yummy!

Monday, June 22, 2009

Strawberry Love - Part 1


I'm sorry I haven't written in...wow, almost a month! While I have been baking, I've had no time to really take pictures so there was nothing to post, but I think I'll more than make up for it with this weekend's activities. My sisters, my nephew and I went Strawberry picking! I've been researching different U-Pick sites in IL for weeks putting together lists of what I want to pick when and with whom and the first one on the list was the McCann Berry Farm in Woodstock, IL. They're located just a bit over an hour away from my sister's house and this past weekend was the middle of a very short season, so we got up early, packed up the car and headed out. We grabbed two baskets each and followed the guide to "our rows" and got to work. The bushes were chock full of beautiful ripe strawberries, so it didn't take long for us to fill up our baskets:


I remember going with my older sister a few years back to a farm in Michigan and I remember how she probably ate more than she picked and how excited she was every time she found a great big red strawberry, so I packed my camera to make sure I got lots of shots of my nephew having at least as much fun as she did. He was not disappointed. He had tons of fun "helping" find the best strawberries and was very serious about not eating the dirty ones until mom washed them from the bottle of water she brought. Here he is, intent and hard at work:


This abundance of strawberries practically demanded to be mashed and chopped and baked into yummy things as soon as I got the buckets home and what I realized pretty quickly was that I didn't pick nearly enough to satisfy everyone, but I was going to try.

When I went to Ireland last year, instead of souvenirs or four-leaf-clover trinkets I bought books. A few novels to read along the way and two great big cook books, one of which was this beautiful Apples for Jam. It's a beautifully written cookbook with a ton of great recipes including one for THE BEST STRAWBERRY JAM EVER! I'm not exaggerating or giving anyone undue credit, but this was a gorgeously red and delicious jam that really only had three ingredients: sugar, lemon juice and strawberries. No pectin, no gelling agents or food colorants, nothing what so ever that would take away from the beautiful fruit. This jam alone should send you out looking for your closest berry farm immediately, it's that good.


And while I think that you should also go and get this book, I'll share the recipe with you here:

1 kg ripe strawberries; washed, dried and quartered
2 cups sugar
juice from 2 lemons

1. Combine all ingredients in a non-metallic bowl and toss to coat. Loosely cover the bowl and put in the fridge overnight. This will make sure that the strawberries release some of their juices and maintain their beautiful color through the cooking process.
2. Pour all the juice and half the chopped berries into a deep pot and bring to a boil. Lower the heat and simmer for 15 minutes.
3. Take the pot off the stove and blend the mixture into a smooth slurry. An immersion blender works great here, but a regular one will work just fine too.
4. Combine the blended berries with the reserved chopped ones back in the pot and bring to a boil again. Simmer for 20 minutes.

That's it! If you'd like to keep some for a while then prepare some jars by boiling them in some hot water and drying them in the oven on low temp, then fill with hot jam, seal and flip them upside down. While the jam is cooling the pressure will seal the jars and flipping them will help prevent condensation.


The next task on the agenda was to make ice cream, strawberry cardamom coffee cake and strawberry tartletts for father's day and to bring to work, but I'll put those into a separate post later tonight. In the mean time I'll leave you with this picture of the tart filling simmering away: